Instructional Design for Online Courses: A Guide
Instructional design for online courses is the architectural blueprint behind a truly great learning experience. I think of it as the thoughtful process of building a guided journey that takes someone from what they know now to what they need to know. It’s about making sure every single step is engaging, effective, and intentional.
Why Planning Your Online Course Matters
Have you ever tried to assemble furniture without the instructions? You might end up with something that looks like a chair, but it will probably be wobbly, unreliable, and honestly, a little embarrassing. Creating an online course without a solid plan is pretty much the same deal.
Sure, you can upload a bunch of videos and PDFs. But without a real structure, you’re creating a digital file cabinet, not a course. You risk leaving your learners confused, frustrated, and clicking away for good.
Instructional design is that essential plan. It forces us to step back and think deeply about our students before we even think about hitting the record button. We need to ask the right questions upfront:
- Who are these people, really? What do they already know, and what are their biggest pain points?
- What specific, tangible skill should they be able to demonstrate when they’re done?
- What’s the absolute best way to present this information so it actually sticks in their brain?
- How will I know, and how will they know, if they’ve truly learned what I set out to teach?
This deliberate approach is what separates a random collection of content from a genuine learning journey that changes someone’s skills or perspective.
The Shift to Intentional Learning Design
The world of online education has absolutely exploded. Back in 2022, the industry was valued at a staggering £179 billion globally, and it’s not slowing down. This massive growth is largely fueled by convenience, with 84% of learners saying it’s a key reason they choose to study online.

With so many courses to choose from, people expect more than a thrown-together video playlist. They want a polished, thoughtful experience that respects their time and delivers on its promises. This is where a real understanding of how people learn becomes your secret weapon. You can see more on these trends in this breakdown of online learning statistics.
Instructional design is about being an advocate for the learner. It’s a commitment to creating an experience that is clear, engaging, and ultimately, successful for the person on the other side of the screen.
Building a Strong Foundation
My favorite way to think about this is by comparing it to building a house. You wouldn’t just show up with a pile of lumber and start nailing boards together, right? You need a detailed blueprint, and to know who’s going to live there, what they need from the space, and how to build a structure that’s both functional and welcoming.
Instructional design provides that blueprint for your course. It’s based on proven methods that consider how adults actually process information and what keeps them motivated, not on guesswork. You can dive deeper into these core concepts in our guide on adult learning theory and its principles.
By starting with a solid plan, you ensure your course is built to last. This provides real value and, most importantly, helps your students achieve the results they signed up for.
Alright, we’ve established that instructional design is the secret sauce for a killer online course. But what does that look like in practice? Let’s pull back the curtain on the actual frameworks the pros use. Think of these as proven playbooks that guide you from a rough idea to a polished, high-impact learning experience.
There are quite a few models out there, but I want to zero in on a handful that are incredibly practical for anyone creating online courses today. We’ll start with the time-tested classic, shift to a more modern and flexible approach, and then look at a framework designed to make every single lesson land perfectly.
The Classic Blueprint: ADDIE
The ADDIE model is the granddaddy of them all. It’s one of the most recognized frameworks in the instructional design world, and for good reason. It provides a clear, logical, five-step roadmap that takes you from A to Z. It’s the perfect choice for projects where structure, predictability, and thoroughness are the most important things.
The five phases are a straight shot from start to finish:
- Analysis: This is your detective phase. Who are your learners, really? What do they already know, and more importantly, what do they need to do after taking your course? You dig deep here.
- Design: Now you architect the experience. You’ll write crystal-clear learning objectives, map out the course structure, and plan all your content and assessments. This is the blueprint.
- Development: Time to roll up your sleeves and build. You’ll record the videos, write the workbooks, and create the quizzes you mapped out in the Design phase.
- Implementation: This is launch day! You deliver the course to your students, usually by uploading it to a Learning Management System (LMS) or your course platform.
- Evaluation: Once the course is out in the wild, you gather feedback and look at the data. What worked? What fell flat? This crucial feedback loop is what makes your next course even better.
For anyone serious about creating a well-structured course, utilizing a robust framework like the ADDIE model is a smart move. Its linear nature helps make sure you don’t miss any critical steps along the way.
The Agile Alternative: SAM
While ADDIE is fantastic for its methodical, waterfall-style process, sometimes you need to be more nimble. That’s where the Successive Approximation Model (SAM) comes into play. If ADDIE is like building a house from a detailed blueprint, think of SAM as building with LEGOs. You create small pieces, test them out, and build upon them iteratively.
SAM is all about rapid prototyping and getting feedback early and often. It ditches the linear path for a more cyclical, build-and-refine approach.
The big idea behind SAM is simple: “start small and iterate.” Instead of aiming for perfection on the first try, you create a rough draft of a small piece, get it in front of people, gather feedback, and make it better. This cycle repeats until you have a final product that’s been battle-tested from the very beginning.
For instance, you might build out just one lesson, share it with a small group of beta testers, and use their input to sharpen it up before you even think about building the rest of the course. This agile method is a lifesaver for complex topics or when you’re not 100% certain what the final course should look like.
Comparing Instructional Design Models: ADDIE vs SAM
Deciding between a structured or an agile approach can be tough. Both are powerful, but they shine in different situations. This side-by-side comparison should help clarify which model might be the right fit for your next project.
| Aspect | ADDIE Model | SAM Model |
|---|---|---|
| Process | Linear and sequential (a step-by-step march) | Cyclical and iterative (a build, test, repeat loop) |
| Best For | Structured, predictable projects with well-defined outcomes | Complex or innovative projects where flexibility is essential |
| Feedback | Primarily gathered at the end in the Evaluation phase | Collected continuously from the very beginning |
| Pacing | Slower, more deliberate upfront planning and development | Faster, with rapid prototyping and quick on-the-fly adjustments |
Ultimately, ADDIE provides a reliable roadmap, ensuring a comprehensive and polished final product. SAM, on the other hand, offers the speed and adaptability needed to innovate and respond to feedback in real-time.
Structuring Your Lessons With Gagne
ADDIE and SAM are brilliant for mapping out an entire course, but what about the nitty-gritty of a single lesson? For that, Gagne’s Nine Events of Instruction is an absolute gem. It’s less of a rigid process and more of a powerful checklist for creating a lesson that actually helps people learn and remember.
Here are the nine events that create a fantastic learning flow:
- Gain attention: Start with a hook. A surprising statistic, a provocative question, or a compelling story.
- Inform learners of the objective: Be direct. Tell them exactly what they’ll be able to do by the end of the lesson.
- Stimulate recall of prior learning: Connect the new stuff to something they already know. This builds a mental bridge.
- Present the content: Deliver the core material clearly and concisely.
- Provide learning guidance: Don’t just lecture. Offer examples, case studies, analogies, or worked-out problems to help it click.
- Elicit performance: Give them a chance to practice the new skill right away.
- Provide feedback: Let them know how they did on their practice attempt. What did they get right? Where can they improve?
- Assess performance: Test their understanding with a short quiz, a challenge, or a small project.
- Enhance retention and transfer: Show them how to apply this new skill in the real world. Make it relevant to their lives.
You don’t have to shoehorn every single event into every video you make, but keeping this framework in mind is a surefire way to make your lessons more engaging and effective. By picking the right model for the right job, whether for the whole course or a single lesson, you set yourself up for success and create a far better experience for your students.
Your Step-by-Step Online Course Design Process
Alright, let’s get practical. We’ve talked about the big-picture models, but now it’s time to roll up our sleeves and walk through the actual steps of building an online course that works. I’m a big fan of using a process inspired by the ADDIE framework because it’s so clear and logical, especially if you’re just starting out.
Think of this as your roadmap. It guides you from a simple idea to a fully functioning learning experience. Each stage builds on the last, making sure you don’t skip any crucial details along the way.
Stage 1: Analysis – Know Your Learners Inside and Out
Before you create a single slide or record a single video, you have to do your homework. The Analysis phase is all about deep empathy. You need to get into the heads of your future students and understand their world.
It’s about asking the right questions to get real answers, not just guessing what they need:
- Who are they? What’s their background? What’s their current skill level, and what’s their biggest frustration with this topic?
- What is their goal? What specific transformation are they looking for after completing your course?
- What are their obstacles? Are they short on time? Do they have technical hang-ups? What has stopped them from learning this before?
Getting this part right is everything. It’s the foundation for your entire course. It ensures that what you create is genuinely relevant and helpful, not just another piece of content.
Stage 2: Design – Architecting the Learning Journey
Once you know your audience, it’s time to switch hats from detective to architect. The Design phase is where you create the blueprint for your course. Honestly, this is probably the most important step in the entire instructional design process for online courses.
During this stage, you’ll map everything out. You’ll write clear, measurable learning objectives, which are simple statements describing what your students will be able to do after a lesson. For example, instead of a vague goal like “Understand social media,” a sharp objective would be “Create a one-month content calendar for Instagram.” See the difference?
You’ll also outline your course structure, breaking down complex topics into digestible modules and lessons. This plan becomes the guide for every piece of content you create next.
This infographic gives you a clean visual of the first three stages in this process. It shows the move from understanding your learners to building the actual content.
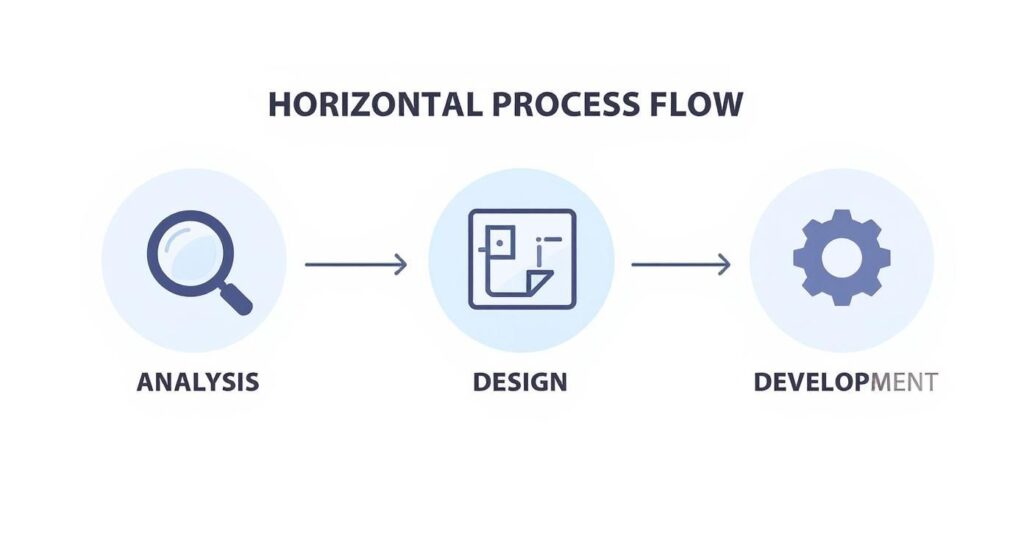
As you can see, the flow is completely logical. It moves from broad investigation in Analysis to detailed planning in Design and, finally, to creation in Development.
Stage 3: Development – Bringing Your Content to Life
Now for the fun part: creating the actual course materials. The Development phase is where your blueprint from the Design stage comes alive. This is where you actually write the scripts, record the videos, design the worksheets, and build the quizzes.
The global shift toward digital education has put a massive spotlight on this stage. The recent pandemic dramatically accelerated online learning, with the U.S. market alone hitting a value of $100 billion in 2022. With nearly half of all students having taken an online course, expectations are high. This makes carefully developed content more important than ever.
To manage the creation of all these materials without losing your mind, it helps to think like a project manager. Keeping things on track is key, so consider strategies for optimizing your content creation workflow as a core part of your design process.
Stage 4: Implementation – Launching Your Course
With your course content created and polished, it’s time for Implementation. This stage is all about getting your course into the hands of your learners. It involves uploading all your materials to your chosen Learning Management System (LMS) or online course platform.
But it’s more than just a technical step. Implementation also includes preparing your students for the learning experience. You might create a welcome video, send out an onboarding email sequence, or host a kickoff call to set expectations and build excitement.
This is your course’s opening night. A smooth and welcoming implementation process sets a positive tone for the entire learning journey and helps students feel confident and supported from day one.
Stage 5: Evaluation – The Secret to Long-Term Success
Finally, we reach the Evaluation phase. Your course is live and students are enrolled, but your work isn’t done. This last stage is a continuous feedback loop that helps you understand what’s working and what can be improved.
There are two key types of evaluation to keep in mind:
- Formative Evaluation: This happens during the course. You can use short surveys, check in on discussion forums, or look at quiz results to see where students might be getting stuck.
- Summative Evaluation: This happens after the course is complete. Think end-of-course surveys, final project reviews, or testimonials that measure the overall impact and satisfaction.
This feedback is gold. It gives you the insights you need to refine your current course and makes every future course you create even better. It’s the final, critical piece of a thoughtful design process.
How to Create Engaging Course Content
Alright, this is where the magic really happens. A solid course structure is the skeleton, but your content is the heart that brings it all to life. Let’s be honest, nobody has ever enjoyed a monotonous, one-sided lecture, and that’s especially true when they’re learning online.
So, how do we make course material that captivates learners and actually makes them want to log in? It starts by creating genuine learning experiences instead of just presenting information. You need to make content that is active, not passive.
Weave a Narrative with Storytelling
Humans are wired for stories. We remember them, connect with them, and learn from them far better than we do from a dry list of facts. Using storytelling is one of the most powerful tools in your instructional design toolkit.
Instead of just explaining a business concept, try framing it as a case study about a small business owner overcoming a specific challenge. This narrative approach makes abstract ideas feel tangible and relevant. A good story gives your learners a reason to care.
To make this work for you, think about how you can:
- Use real-world examples: Share stories of how the skills you’re teaching have been successfully applied in the wild.
- Create a course-long narrative: Introduce a problem or a character in the first module that learners follow and help solve throughout the course.
- Share personal anecdotes: A relatable story from your own experience can build trust and make a concept stick in a way a textbook never could.
This approach transforms your content from a simple lecture into a memorable journey. If you’re looking for more ways to structure your lessons effectively, our guide on instructional design best practices is a great next step.
Make Learning an Active Sport
Passive learning, like watching a video or reading text, has its place. But real, deep learning happens when students get their hands dirty. Your course should be packed with opportunities for learners to apply what they’re learning immediately.
Think about incorporating a variety of activities that require active participation. This not only reinforces the material but also builds confidence as learners see themselves successfully using their new skills.
The goal is to shift your students from being spectators to being active players in their own education. Every activity, no matter how small, is a step toward true mastery.
Here are a few ideas to get you started:
- Interactive Quizzes: Design quizzes that feel more like fun challenges than scary tests. Use different question formats and provide immediate, constructive feedback.
- Meaningful Discussions: Pose open-ended questions in a forum that encourages students to share their perspectives and learn from one another.
- Hands-On Projects: Assign small, manageable projects that require learners to create something tangible, like a simple marketing plan or a short piece of code.
Spark Motivation with Gamification
Who says learning can’t be fun? Gamification is the strategic use of game-like elements in a non-game context, and it’s a fantastic way to boost motivation and engagement in online courses. It taps into our natural desire for achievement, competition, and reward.
Simple gamification elements can make a huge difference in keeping learners on track. Think about adding things like points for completing lessons, badges for mastering a module, or a leaderboard for a little friendly competition. This trend is a significant part of the booming e-learning market, which is on track to hit $325 billion by 2025.
These techniques aren’t just gimmicks. They provide a clear sense of progress and make the learning process feel more rewarding. By combining compelling storytelling, active learning, and smart gamification, you can create a course that doesn’t just teach, it truly engages.
Choosing the Right Technology and Tools for Your Course
You’ve got a solid plan and some fantastic content ideas brewing. But the big question remains: where will your course actually live online? Picking the right technology is a huge piece of the instructional design puzzle, and honestly, it can feel a bit overwhelming at first.
My goal here is to help you cut through the jargon and navigate the world of e-learning tech. We’ll look at the key platforms and tools that can bring your course to life, focusing on what you actually need to create an amazing experience for your learners.
Your Course’s Home Base: The Learning Management System
The most important piece of tech you’ll choose is your Learning Management System, or LMS. Think of the LMS as the digital campus for your course. It’s the central hub where you’ll host your videos, upload materials, interact with students, and track their progress.
Choosing an LMS is a big decision, so you want to find one that fits your needs without creating headaches down the road. There are tons of options out there, but they are definitely not all created equal.
When you’re shopping around, here are a few key features to look for:
- Ease of Use: Is the platform intuitive for both you and your students? A clunky, confusing interface is a surefire way to kill motivation.
- Content Hosting: Can it easily handle different types of content, like videos, PDFs, and interactive elements without a fuss?
- Student Interaction Tools: Does it have built-in features for discussions, quizzes, and assignments to keep learners engaged and connected?
- Progress Tracking: Can you see how your students are doing at a glance? This is essential for providing support and figuring out what’s working (and what isn’t).
Building Your Content: Authoring Tools
Once you have your LMS, you need to actually create the content that goes inside it. This is where authoring tools come in. These are simply the applications you use to build your course materials, from simple slide decks to complex, interactive simulations.
The good news is you don’t need to be a tech wizard. There’s a tool for every skill level and budget. You can absolutely start with familiar programs like Canva or PowerPoint to create beautiful presentations and worksheets.
When you’re ready to create more dynamic experiences, you can explore specialized e-learning software. To get a better sense of what’s available, I’d recommend checking out this guide on the best authoring tools for e-learning. It breaks down the pros and cons of popular options like Articulate Storyline and Adobe Captivate, which are fantastic for building truly interactive lessons.
Essential Media and Engagement Tools
Beyond your LMS and authoring software, a few other tools can seriously elevate your course content. These help you create the media that makes your course feel dynamic and engaging, not like a dusty old textbook.
You don’t need a Hollywood budget to produce high-quality materials. Here’s a short list of tool categories to consider for rounding out your tech stack:
- Video Recording and Editing: Tools like Loom or Camtasia are perfect for creating screen recordings and simple video lessons.
- Quiz and Survey Builders: Interactive quizzes are a great way to check for understanding. Many LMS platforms have this built-in, but dedicated tools like Typeform can offer more creative and engaging options.
- Collaboration and Community Platforms: If you want to build a strong community, a platform like Circle.so or even a private Facebook group can be a great addition to your course ecosystem.
The key is to start with what you need and add more tools as you grow. Your technology should support your instructional design, not dictate it. Choose tools that feel comfortable and allow you to focus on what matters most—creating a great learning experience.
Putting It All Together With a Real-World Example

Theory is great, but let’s be honest, seeing how these models work in the real world makes everything click. So, let’s walk through a practical case study to see how instructional design for an online course actually plays out from start to finish.
Imagine we’re creating a course called “Digital Marketing Basics for Small Business Owners.”
I’m going to use the ADDIE model for this example. Its straightforward, step-by-step structure is perfect for showing how all the pieces connect in a logical flow.
First, We Analyze
We kick things off with the Analysis phase. Who are we actually teaching? Our target audience isn’t a group of marketing pros. They’re busy small business owners, likely feeling overwhelmed by technology and definitely short on time.
They don’t know the difference between SEO and SEM, and their biggest pain point is feeling totally invisible online. This tells us the course needs to be practical, quick to digest, and focused on low-cost, high-impact strategies.
To confirm our assumptions, we’d send out surveys to our email list or even hop on a few calls with potential students. This initial research is the bedrock for everything that comes next.
Next, We Design and Develop
With our research in hand, we move into the Design phase. Here, we nail down our learning objectives. For our digital marketing course, they might look something like this:
- Objective 1: By the end of Module 1, students will be able to perform basic keyword research for their business.
- Objective 2: By the end of Module 2, students will be able to create a one-month social media content calendar.
- Objective 3: By the end of the course, students will be able to build a simple, one-page marketing plan.
See how these are all action-oriented? Now we can shift into Development. We’ll create short, punchy video tutorials on SEO basics and social media scheduling. We’ll also build downloadable resources they can actually use, like a content calendar template and a marketing plan worksheet.
The final project? They submit their own completed one-page plan.
This hands-on approach ensures learners aren’t just passively consuming information. They are actively building something valuable for their own business as they move through the course.
Finally, We Implement and Evaluate
It’s time for the Implementation phase. We upload all our videos and workbooks to our learning management system (LMS), organize them into clear modules, and open the doors for enrollment.
As soon as students start joining, we slide right into the Evaluation phase. This isn’t a one-and-done thing, it’s ongoing.
We’d sprinkle in short quizzes to check for understanding after key lessons. We’d also keep a close eye on the discussion board for common questions and gather feedback through an end-of-course survey. This data is pure gold. It tells us exactly which parts of the course are hitting the mark and where we can make it even better for the next cohort of students.
Frequently Asked Questions
Got questions about instructional design for online courses? You’re not alone. I’ve gathered a few of the most common ones I hear to give you some clear, straightforward answers.
How Is Online Course Design Different from Classroom Design?
The biggest difference isn’t the content, it’s the medium. When you’re designing for a screen instead of a room full of people, you lose the natural energy and feedback loop of in-person interaction.
That means you have to be much more deliberate about creating engagement. You can’t just rely on your personality to carry the lesson, but instead have to build in things like discussion forums, collaborative projects, and interactive quizzes to pull learners in and keep them involved. Also, you have to think a lot more about technology, accessibility, and how to make information pop on a screen.
Do I Need to Be a Tech Expert to Design a Course?
Absolutely not. While it helps to be comfortable with technology, modern tools and Learning Management Systems (LMS) are surprisingly user-friendly these days. Your most important skills are understanding how people learn, staying organized, and thinking creatively.
You can start with simple tools and learn the more advanced software as you go. The focus should always be on the quality of the learning experience, not the flashiness of the technology behind it.
How Long Does It Take to Design an Online Course?
This is the classic “it depends” question. A simple, one-hour course might take a solid 20-40 hours to design and develop properly. A more complex, multi-module course packed with custom video and interactive elements could easily run into several hundred hours.
The most critical part is the design phase, which is the planning and outlining you do before you ever create a single piece of content. Rushing this step is a recipe for a confusing, ineffective course and a ton of rework for you down the line.
A good rule of thumb is to spend at least as much time planning and designing as you do creating the actual content. This upfront investment always pays off in the end.