A Practical Guide to ADDIE Model Training
If you’ve ever felt completely overwhelmed trying to create a training course from scratch, you’re not alone. Staring at a blank page is intimidating. It’s easy to get lost wondering what content to include, how to structure it all, and if your students will even find it useful.
That’s where the ADDIE model comes in. It’s a five-step framework that I use to design and build effective learning programs. Think of it as a structured recipe, Analysis, Design, Development, Implementation, and Evaluation, that ensures any training you create is focused, practical, and actually hits the mark.
The Proven Roadmap for Effective Training
ADDIE is the step-by-step roadmap that keeps me from wasting time and money on ideas that just won’t work. It forces me to ask the right questions at exactly the right time, guiding me from a fuzzy concept to a finished, effective course.
What ADDIE Stands For
The beauty of the ADDIE model is its straightforward, logical flow. Each phase builds directly on the last, creating a solid foundation for your entire training program.
- Analysis: This is where you get to the bottom of who your learners are and what they really need to learn, not just what you think they need.
- Design: You’ll create a detailed blueprint for your course, outlining specific learning objectives and mapping out how you’ll present the material.
- Development: Here’s where the blueprint comes to life. You’ll create the actual course content, like the videos, worksheets, quizzes, and everything else.
- Implementation: It’s launch time. This phase is all about rolling out your course and getting it into the hands of your learners.
- Evaluation: Finally, you’ll measure how well the training actually worked and gather crucial feedback for making it even better.
My first big course launch was a complete mess. I jumped straight into creating content I thought was brilliant, only to find out it didn’t solve my audience’s real-world problems. By skipping a proper analysis, I built something nobody actually needed. Learning the ADDIE model was a total game-changer for my next project.
Why This Old-School Method Still Works
The ADDIE model got its start in the US military back in the 1970s and has since become a cornerstone for creating training in high-stakes fields like aviation, healthcare, and corporate compliance.
Think about that for a second. The same five-step process used to ensure safety in commercial aviation can be scaled down for your five-lesson micro-course or a twelve-week signature program. It provides a proven backbone for creating high-quality digital learning, no matter the scale.
And while ADDIE is often shown as a straight line, it’s incredibly flexible. In reality, it works best with an iterative project management approach, where the phases can overlap and you continuously refine your work based on feedback. This structure makes it a practical, adaptable system for any creator looking to build training that truly delivers results.
Building the Foundation with Audience Analysis

Everything in the ADDIE model kicks off with the first, and arguably most important, phase: Analysis. This is where you stop making assumptions and start figuring out who you’re actually creating this training for. It’s so tempting to just jump in and start building content, but I can tell you from experience, that’s how you end up with a course that nobody uses.
Trust me, I’ve made that mistake before. A solid analysis phase is what separates a course that collects digital dust from one that genuinely solves a real-world problem for your audience. It all comes down to asking the right questions before you ever design a single slide or record a video.
Figuring Out Who Your Learners Are
The first part of analysis is getting a crystal-clear picture of your audience. I’m not just talking about basic demographics. We need real insights into their day-to-day challenges, what they already know (and don’t know), and what truly motivates them to learn.
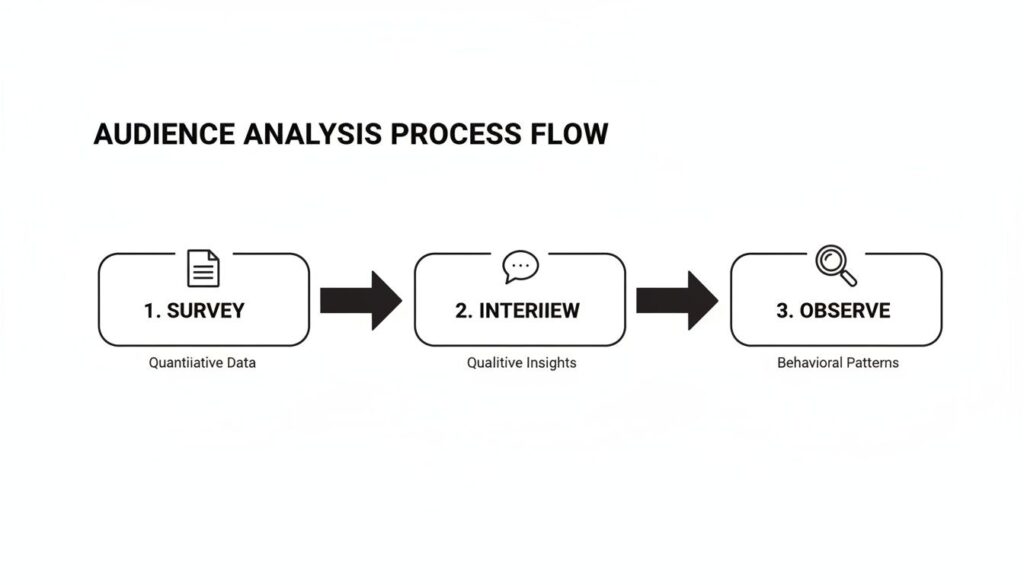
So, where do you find this stuff? You have to go straight to the source.
- Surveys: These are fantastic for gathering quantitative data quickly. You can ask about experience levels, preferred learning formats, and specific topics they find challenging. Pro tip: keep them short and super-focused to get the best response rates.
- Interviews: This is where you strike gold. A quick 15-minute chat with a few of your ideal learners can uncover pain points and motivations that a survey would never reveal.
- Data Mining: Look at the data you already have. What are the most common questions in your community forum? What are the top 3-5 issues people are submitting support tickets about? This is a treasure trove of information about where people are really getting stuck.
I once worked on a membership site where we were convinced our members wanted advanced, complex strategies. But after digging into their community posts and support emails, we saw that the overwhelming majority were struggling with the absolute fundamentals. That one insight prompted a complete redesign of our onboarding course, which dramatically improved member engagement and success.
Defining the Real Training Need
Once you have a handle on your audience, you need to pinpoint the exact gap between where they are now and where they need to be. We call this a needs analysis. It’s the process of identifying the specific skill or piece of knowledge your training has to deliver to solve their core problem.
A proper needs analysis ensures your training is a ‘must-have’ solution, not just a ‘nice-to-have’ product. It directly connects the learning content to a real-world outcome, whether that’s reducing support queries or boosting member retention.
To help you get started, we’ve put together a resource you can use right away. You’ll find a comprehensive guide and a handy template in our article on creating a training needs assessment template. It walks you through the key questions to ask to make sure your training is perfectly aligned with both learner needs and your business goals.
For even deeper insights, learning how to conduct a focus group effectively can also be incredibly valuable. These guided discussions can reveal nuanced perspectives and group dynamics that one-on-one interviews might miss.
Setting the Scope of Your Project
The final piece of the analysis puzzle is defining your project’s scope. It’s shockingly easy for a training project to balloon into an unmanageable monster. The data you’ve gathered is what helps you make the tough but necessary decisions about what’s in and what’s out.
Ask yourself these critical questions:
- What is the primary business goal? Are you trying to increase member retention, reduce the number of support tickets by 20%, or improve a specific user skill? Every single piece of content should directly support this goal.
- What must learners be able to do after this training? Always focus on actionable outcomes, not just what they’ll “know.” This helps you trim the fat and get rid of any content that doesn’t contribute to a specific, measurable skill.
- What are my constraints? Get real about your budget, timeline, and available resources. It’s far better to launch a smaller, polished training program that solves one problem exceptionally well than a massive, unfinished one that solves nothing.
This whole process ensures your training is built on a solid foundation of real data, not just hunches. It gives you a clear, focused blueprint to follow, setting you up for success in all the phases to come.
Designing and Developing Your Course Blueprint
Once you’ve done the hard work of analysis, it’s time to get creative. This is where the training idea really starts to take shape, and I’ve found it’s most effective to combine the Design and Development phases of the ADDIE model. The tools we have today make these two steps feel like one fluid, connected motion anyway.
We’re going to kick things off with the single most important part of the design phase: writing clear, measurable learning objectives. This isn’t just academic busywork. Your learning objectives are a direct promise to your students, defining exactly what they’ll be able to do after they finish your training.
Starting with Clear Learning Objectives
Vague goals lead to vague, ineffective content. It’s that simple. A solid learning objective is always specific and action-oriented. For instance, a fuzzy goal like, “Learners will understand social media marketing,” should be rewritten as something much stronger: “Learners will be able to create a one-month social media content calendar for Instagram.”
See the difference? One is a concept, the other is a concrete, verifiable skill.
To write objectives that work, I always lean on a proven framework. Check out our guide on using Bloom’s Taxonomy for writing learning objectives for a simple, step-by-step process. It helps you find those powerful action verbs that make your objectives measurable and crystal clear.
Visualizing Your Content with Storyboards
With your objectives locked in, the next step is to map out the actual flow of your content. A storyboard is your best friend here. It’s essentially a visual plan for each lesson, whether you’re creating a video, a quiz, or a simple worksheet. It doesn’t need to be fancy, a simple document or a few slides works perfectly.
For a video lesson, your storyboard might include these key pieces:
- Scene Number: A quick reference to keep things organized.
- On-Screen Visuals: What will the learner see? Is it a slide with bullet points? A screen recording? You talking to the camera?
- Narration/Script: What will you be saying during that scene? Write it out.
- Key Takeaway: What is the one non-negotiable thing the learner must remember from this scene?
This process forces you to think through the entire learning experience from your student’s point of view. It’s the best way I know to catch gaps in your logic and ensure a smooth, intuitive flow before you spend a single minute recording or building.
Speeding Up Development with Modern Tools
Now for the really fun part. The development phase of ADDIE model training used to be a long, painstaking process. Today, we have an incredible suite of tools that can dramatically speed things up without sacrificing quality, especially with the rise of AI-powered software.
The global L&D market is now estimated at over USD 350 billion, and a big chunk of that is driven by these new AI-enhanced solutions. The AI in education market alone is projected to grow from about USD 7.05 billion in 2025 to roughly USD 112.30 billion by 2034. That’s a massive shift happening right in the Design and Development stages. Companies are already seeing results, with some reporting around a 20% productivity increase after adopting AI-driven training. You can read more about these AI training statistics to see just how big this trend is.
For creators like us, this means the ADDIE workflow is no longer just a manual project plan. It’s a system where AI can accelerate the heavy lifting, letting us focus more on strategy and less on tedious production tasks.
AI-powered tools can be a game-changer for efficiently creating high-quality course content. Here’s a look at some popular options that align perfectly with the Design and Development phases.
Popular AI Tools for the Design and Development Phase
| Tool Category | Example Tool | Primary Function | Key Benefit |
|---|---|---|---|
| Script Writing | Jasper AI | Generates outlines and full scripts from prompts | Overcomes writer’s block and structures content logically |
| Voiceover Generation | Murf.AI | Creates human-like voiceovers from text scripts | Saves hours of recording and editing audio |
| Video Creation | Synthesia | Produces AI-avatar videos from scripts | Eliminates the need for on-camera recording and equipment |
| Quiz Generation | Quizgecko | Creates quizzes and assessments from content | Quickly builds knowledge checks to reinforce learning |
These tools aren’t about replacing your expertise, they’re about amplifying it. They handle the repetitive, time-consuming tasks so you can focus on what really matters, crafting a learning experience that delivers real results for your students.
Here’s a simple, practical workflow blending AI into your process:
- Draft Your Script: Write the initial script for a video lesson in a document or use an AI writer to generate a first draft.
- Generate a Voiceover: Use a text-to-speech tool like Murf.AI to create a clean, professional audio track. This saves hours of recording and editing.
- Create Video Content: Feed that script and voiceover into an AI video creator. These tools can automatically generate visuals and sync everything up.
- Build a Quiz: Paste your script into an AI quiz generator to create a quick knowledge check based on your lesson’s key points.
This entire design process is fueled by the insights you gained during the Analysis phase. This flow chart is a great reminder of how that data collection directly informs your blueprint.
By combining the timeless structure of the ADDIE model with modern tools, you can create professional-grade training content faster than ever before. This approach lets you build a solid course blueprint based on real learner needs and bring it to life efficiently and effectively.
Launching and Implementing Your Training
You’ve poured your heart and soul into creating this training. You’ve analyzed, designed, and developed it. Now for the fun part: the Implementation phase. This is where your course finally gets into the hands of your learners. It’s go-time, and a few key decisions here can make all the difference.

One of the first things you’ll have to figure out is how you’re going to get this training to your people. The platform you pick isn’t just a technical detail. It shapes the entire learning experience.
Choosing Your Delivery Platform
You’ve basically got two main routes to consider: a classic Learning Management System (LMS) or one of the newer, community-focused platforms. I’ve built courses on both, and each has its own vibe.
A traditional LMS is like a dedicated digital classroom. It’s purpose-built for hosting course content, tracking student progress, and handling quizzes or assessments. These systems are robust and highly structured, which is perfect if you’re running a formal certification program or need detailed reporting.
On the flip side, platforms like Circle or Heartbeat are built around conversation. The training content is woven directly into the community fabric, making it feel less like a formal class and more like an ongoing, collaborative discussion. I’ve seen this work wonders for membership sites where the real goal is to keep people engaged long-term and encourage them to learn from each other.
- LMS Pros: Great for structured courses, detailed progress tracking, and formal assessments. They feel buttoned-up and professional.
- Community Platform Pros: Amazing for building relationships, sparking discussions, and creating a true sense of belonging around your content.
Honestly, the best choice ties directly back to the goals you set in the Analysis phase. If long-term member engagement and peer support are your North Star, a community platform is probably the way to go. But if you need to deliver a high-stakes, structured certification course, an LMS will give you the control and features you need.
Your Pre-Launch Technical Checklist
A smooth launch is no accident. It’s the direct result of double-checking every little detail before anyone logs in. The absolute last thing you want is for your first excited students to be met with broken links, login errors, or payment glitches.
Before you flip the switch, make this your mantra and run through this checklist:
- Do a Full User Test Run: Grab a friend or a few beta testers and have them go through the entire process from start to finish. I mean everything, signing up, paying, getting the welcome email, logging in for the first time, and clicking through the first module. This is where you’ll find all the weird little bugs.
- Double-Check All Links and Assets: This is tedious but non-negotiable. Click every single link. Download every PDF. Play every video. Assume nothing works until you’ve seen it work yourself.
- Prepare Your Welcome Sequence: That first email a new student receives is a critical first impression. Make sure it’s written, loaded into your email provider, and set to trigger the instant someone enrolls.
- Confirm Payment Gateway Integration: Don’t just assume it’s working. Run a real test transaction to make sure your payment system is talking to your course platform correctly.
Think of your launch not as a finish line, but as the start of a conversation. Your goal should be creating an environment where people feel supported and ready to succeed from the moment they join.
Rolling Out for Maximum Impact
Once the tech is locked down, you can focus on the human side of the launch. It’s all about building a little buzz and being there for your students during those crucial first few days and weeks.
A great way to do this is to warm up your audience before the doors even open. Send out a few emails teasing the content, share a sneak peek of a lesson, or talk about the transformation they can expect. This builds anticipation and gets people excited to jump in.
And once people are inside, be visible. Host a live kickoff call. Start a welcome thread in the community space and personally greet new members. Make it clear you’re there to answer questions. Showing up for your students right at the beginning sets a supportive and engaging tone for the entire program, proving the value of your addie model training from day one.
Measuring Success with Smart Evaluation
So, you’ve launched your training. That’s a huge milestone, but the work isn’t quite done. The final phase of the ADDIE model is Evaluation, and it’s where you find out if all your hard work actually paid off. This is how you discover what worked, what didn’t, and how to make your next course even better.
This phase is so much more than just looking at course completion rates. While it’s nice to see people finish your content, that number doesn’t tell you if they actually learned anything or if the training solved the problem you identified way back in the Analysis phase.

We need to dig deeper to measure success in a way that truly matters, whether you’re running a membership or selling a signature course.
Going Beyond Simple Completion Rates
To get a full picture of your training’s impact, it’s helpful to look at a few different layers of data. Think of it as gathering clues from multiple sources to see the whole story.
Here’s what I focus on when evaluating my own training programs:
- Learner Satisfaction: Did they enjoy the experience? A simple survey asking about their satisfaction with the content, platform, and instructor support can give you a quick pulse check.
- Knowledge Gain: Did they learn what you intended to teach? Quiz scores and practical assessments are great for this. If you set clear learning objectives in the Design phase, this part is much easier to measure.
- Behavioral Change: This is the big one. Are your students actually using the skills you taught them? This is where you see the true impact of your addie model training.
The goal of the Evaluation phase is to turn data into actionable insights. It helps you find specific opportunities to improve the learning experience and the business results.
This is where ADDIE’s structured approach really shines. There’s a growing trend towards data-rich analysis in learning and development, and for good reason. Just look at the AI training dataset market, it’s projected to explode from USD 3,195.1 million in 2025 to USD 16,320 million by 2033. This flood of data gives creators like us the power to move beyond intuition and make decisions based on real user behavior. You can read more about the growing AI dataset market to get a sense of this massive shift.
Connecting Training to Business Impact
For a course creator or membership owner, the most meaningful metrics are the ones that connect directly to your bottom line. We’re running businesses, after all. The key is to link your training outcomes to tangible business goals.
Are your members using the new skills? Is the course you created reducing churn in your membership? Or is it leading to more upsells for your other products? These are the questions that show the real return on your investment.
To help you get started, here’s a simple framework for organizing your evaluation metrics.
Key Evaluation Metrics for Digital Courses
This table breaks down the different levels of evaluation, giving you practical metrics to track for each. This helps connect what happens inside your course to what happens in your business.
| Evaluation Level | Metric to Track | How to Measure It |
|---|---|---|
| Reaction | Learner Satisfaction | Post-course surveys, star ratings, and direct feedback. |
| Learning | Quiz & Assessment Scores | Scores from quizzes, completion of capstone projects. |
| Behavior | Skill Application | Self-reported progress, case studies, or observing new work. |
| Results | Business Impact | Reduced churn, increased upsells, fewer support tickets. |
Measuring these things doesn’t have to be complicated. You can start with a simple post-course survey that mixes in a few multiple-choice questions for easy data collection and an open-ended question like, “What was the single most valuable thing you learned?” for that rich, qualitative feedback.
For a deeper dive, check out our guide on how to measure training effectiveness, which offers more strategies and tools.
Creating a Loop of Continuous Improvement
The most important thing to remember about the Evaluation phase is that it’s not the end. The insights you gather here feed directly back into the very beginning of the ADDIE cycle.
Found out a specific lesson was confusing for most students? That’s an insight you can use to re-design and re-develop that module. Discovered that your members are asking for a follow-up course on a related topic? That’s your next Analysis phase, ready to go.
This creates a powerful loop of continuous improvement. Each time you run through the ADDIE model, your training gets sharper, more effective, and more valuable to your audience. This iterative process is what turns a one-off course into a constantly evolving and highly successful learning program.
Common Questions About ADDIE Model Training
When you first start looking at the ADDIE model, it’s normal to have a few questions. It looks neat on paper, but how does it actually hold up in the real world of deadlines, tight budgets, and messy creative projects? I’ve been there, and I want to clear up some of the most common things people get stuck on.
My goal here is to give you practical, straight-up answers based on my own experience building courses. Think of this framework as a tool, and like any good tool, you have to know how and when to use it to get the best results.
Is ADDIE Too Rigid for Creative or Agile Projects?
This is probably the number one question I get. People see those five distinct phases and immediately think it’s a rigid, waterfall-style process where you can’t move to the next step until the previous one is absolutely perfect. Sounds awful, right?
The good news is, that’s not how you have to use it. While the classic model looks linear, I never actually use it that way. I treat it as a flexible, iterative cycle. You can, and absolutely should, jump between the phases as you get new information and feedback.
For example, you might get halfway through the Development phase and realize a key concept isn’t landing with your beta testers. That’s a powerful evaluation insight. Instead of pushing forward, you pop right back to the Design phase to rethink that section.
The secret to using ADDIE in a fast-paced environment is to think of it as a checklist, not a set of concrete steps. It ensures you don’t skip the important thinking, like analysis and evaluation, even when you’re moving quickly.
This approach makes it perfectly suited for agile projects or creative topics where you need to adapt on the fly.
How Can I Adapt ADDIE for a Small Project?
Not every project needs a massive, months-long ADDIE cycle. If you’re creating a short microlearning video or a simple downloadable guide, a full-blown process would be total overkill. The key is to scale the effort in each phase to match the project’s size.
Here’s how you can run a “mini-ADDIE” cycle for a smaller project:
- Analysis: Instead of formal surveys and focus groups, this could be a quick 15-minute chat with a couple of your ideal customers. Or maybe you just scan your community’s top 5 most-asked questions.
- Design: Forget the massive storyboard. This might just be a simple one-page outline or a few bullet points in a Google Doc.
- Development: You create the content. This phase is usually the same, just much shorter.
- Implementation: You share the resource with your audience. Simple.
- Evaluation: Ask for feedback in your next email or post a question in your community. “Hey, did anyone find that new guide useful? What was the best part?”
This scaled-down approach lets you get the benefits of the structure without getting bogged down in unnecessary process. It keeps you focused on the learner’s needs, even for the smallest pieces of content.
How Long Does a Typical ADDIE Cycle Take?
This is the classic “it depends” question, but I can give you some realistic benchmarks from my own experience as a solo creator. The timeline for an addie model training project is hugely influenced by the course’s complexity, your own experience, and the tools you’re using.
For a medium-sized online course (think 5-7 modules), here’s a rough breakdown of what to expect:
- Analysis: 1-2 weeks. This involves your research, surveys, and a few interviews. Don’t rush this part, good analysis saves you tons of time later.
- Design: 1-2 weeks. This is for outlining, writing solid learning objectives, and storyboarding your content.
- Development: 3-6 weeks. This is almost always the biggest chunk of time. It involves all the hands-on content creation, like recording videos, designing worksheets, and building quizzes.
- Implementation: 1 week. This covers your platform setup, final user testing, and all the little launch prep tasks.
- Evaluation: Ongoing. You’ll do an initial check right after launch, but the real, meaningful evaluation happens over time as you see student results.
So, for a solo creator building a significant course, a realistic timeline is anywhere from 6 to 11 weeks. This might seem like a lot, but building a high-quality program that gets real results for your students is a serious undertaking. The ADDIE model just makes sure that time is well spent.