
How to Design Branching Scenarios in Courses

Designing branching scenarios in courses starts with a simple idea: give learners meaningful choices.
Instead of just presenting information, you’re creating a simulation where their decisions lead to different outcomes. I like to think of it as building a story where the learner is the main character, turning learning into an active, engaging process.
Why Your Courses Need More Than Static Content
Let’s be honest. A lot of online courses feel like a PowerPoint deck brought to life. They’re packed with information but don’t always spark real engagement. We’ve all mindlessly clicked “Next” through slides of text, just hoping the quiz at the end isn’t too tricky.
This is where branching scenarios completely change the game for both learner interaction and knowledge retention.

This approach gives learners agency, which is the power to make choices and see direct consequences. That simple shift transforms them from passive viewers into active participants in their own learning journey. It’s an incredibly powerful way to develop critical thinking and help people connect abstract ideas to situations they’ll actually face.
Moving From Telling to Showing
Instead of telling a new manager the best way to handle a difficult employee, a branching scenario puts them in that exact situation. They have to choose their words, navigate the conversation, and see the results firsthand, good or bad.
This is a core principle of what is known as interactive learning, where doing is far more important than just reading. It’s so effective because it helps learners build mental models for handling complex, nuanced problems.
Here’s a quick breakdown of how branching scenarios upgrade the learning experience compared to a standard linear course.
Comparing Linear Courses to Branching Scenarios
| Feature | Traditional Linear Course | Branching Scenario Course |
|---|---|---|
| Learner Role | Passive Observer | Active Participant |
| Pacing | Fixed, one-size-fits-all | Learner-driven, personalized |
| Content Path | Single, predetermined route | Multiple, consequence-based paths |
| Feedback | Delayed (e.g., end-of-module quiz) | Immediate and contextual |
| Mistakes | Penalized with a lower score | A safe opportunity to learn |
| Key Skill | Information Recall | Critical Thinking & Decision-Making |
As you can see, the shift is from simple information delivery to true skill development.
This approach brings some huge benefits to the table:
- Deeper Engagement: When learners know their choices actually matter, they pay much closer attention. They become invested in the story and the outcome.
- Safe Failure: Scenarios provide a risk-free environment to make mistakes. A wrong choice doesn’t lead to a real-world disaster but to a valuable learning moment with constructive, immediate feedback.
- Improved Retention: We remember experiences far better than we remember facts listed on a page. A branching scenario creates a memorable story that sticks with you long after the course is over.
By simulating real-world challenges, branching scenarios prepare learners for the nuances and pressures of their jobs. It’s the closest you can get to on-the-job training without the real-world risks.
Another great thing about these scenarios is their built-in adaptability. They can cater to different learning styles and existing knowledge levels. A novice might explore every wrong path just to understand all the consequences, while an expert might navigate to the ideal outcome on their first try.
This creates a more personalized and effective path for every single student. It’s a move away from one-size-fits-all content and toward a truly responsive educational experience that respects the learner’s unique perspective.
Before you even dream of writing a single line of dialogue or mapping out a clever choice, you have to pour the foundation. A powerful branching scenario is built on a rock-solid plan that zeroes in on a single, critical goal.
You have to get laser-focused here. The single most important question in this entire process is, “What specific skill or decision do I want the learner to master?” Resist the temptation to teach five things at once. Just pick one critical moment.
For instance, a goal like “Improve customer service skills” is far too vague. It doesn’t give you a finish line. A much better goal is, “Teach a support agent how to de-escalate a conversation with a frustrated customer who received the wrong product.” See the difference? One is a fuzzy concept, the other is a concrete, measurable action.
A focused learning objective acts as your North Star. Every character, choice, and consequence you design should directly serve that single purpose. If it doesn’t, it’s just complexity for complexity’s sake.
Get to Know Your Learners
Once I have that goal locked in, my next thought is always about the people who will actually click through the scenario. I need to get inside their heads. What do they already know about this topic? More importantly, what are the common mistakes they make in their day-to-day jobs that get them into trouble?
This insight is everything. It’s the key to creating realistic choices and meaningful consequences. The best scenarios live in the gray areas of real work, where the “right” answer isn’t always screamingly obvious.
To keep this straight, I’ll often sketch out a simple learner persona. It doesn’t need to be a formal, multi-page document. A few bullet points can do the trick.
- Role: New sales representative, six months into the job.
- Current Knowledge: Understands the product features well but gets hesitant during price negotiations.
- Common Mistake: Tends to offer a discount too early in the conversation instead of reinforcing value first.
- Motivation: Wants to feel more confident and hit their sales quota.
This simple profile keeps the whole design process grounded in their reality. It helps me write dialogue that sounds like something they’d actually hear and create choices that reflect the real pressures they face. When laying the groundwork for your scenario, it’s crucial to consider the core challenges and how learners will navigate them. Using structured problem-solving techniques can provide a robust backbone for your scenario’s design.
By focusing on the learner’s world, you ensure the final product isn’t just an interesting story. It becomes a practice field that solves a genuine problem for them, giving them the reps and confidence they need to succeed when it really counts. That’s how you design branching scenarios in courses that truly make an impact.
Mapping Your Learner’s Decision-Making Journey
Alright, we’ve nailed down our learning objective and have a sharp picture of our learner. Now for the fun part. This is where we take that abstract idea and start building the skeleton of our story. It’s time to map out the entire experience, from the first problem to every possible outcome.
Don’t worry, you don’t need any fancy software for this. I usually just grab a whiteboard and a stack of sticky notes. Some people prefer a simple flowchart tool. The goal is the same: create a visual map of the entire decision tree. Think of this map as the blueprint for everything that follows.
A well-planned visual map of your scenario’s groundwork is what sets you up for success. It forces you to think through the goal, audience, and needs right from the start.
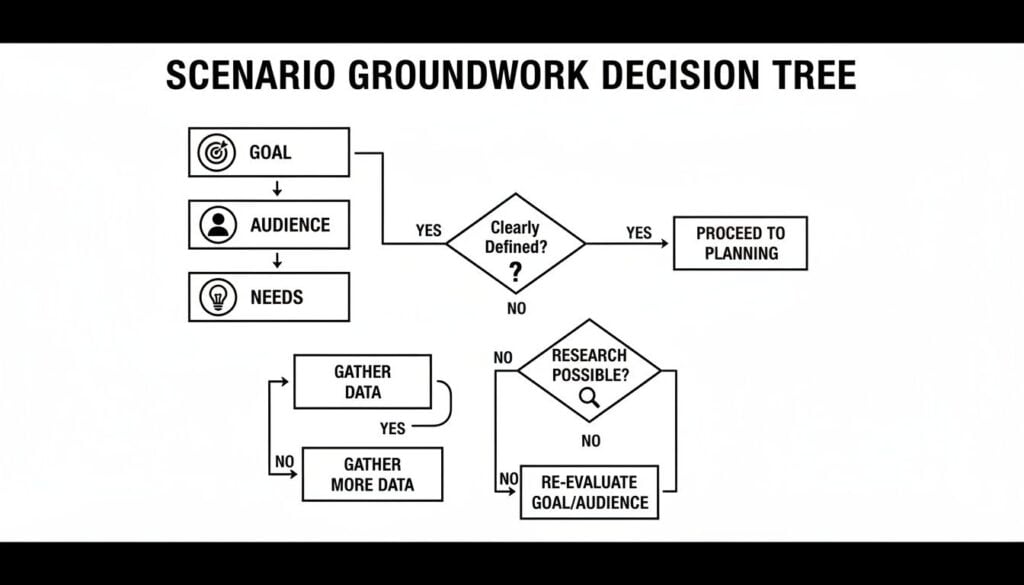
This visual approach helps you see how every piece connects, letting you untangle tricky logic before you’ve written a single line of the course.
The growing use of branching scenarios in professional training isn’t just a trend, either. Research shows that learners who interact with these scenarios have much better retention and higher engagement compared to those who just watch a video or read a document. The interactive, decision-making mechanic is precisely why it works so well. You can get more insights into how branching scenarios boost engagement on knowledgeone.ca.
Designing Meaningful Decision Points
The heart and soul of your map are the decision points. These are the moments where your learner has to make a choice. The real key here is to create choices that reflect real-world nuance, not just painfully obvious “right” and “wrong” answers.
A bad decision point looks something like this:
- A. Be polite to the angry customer.
- B. Yell at the angry customer.
- C. Ignore the angry customer.
That’s not a real choice. A good decision point offers plausible options that an actual employee might consider, especially when they’re under pressure.
Let’s map out a quick example. Imagine our goal is to teach a new customer service agent how to handle a tough refund request for a product that’s just outside its warranty period.
The Setup: A longtime customer, “Karen,” is on the phone. She’s frustrated because her product failed a week after the warranty expired. She wants a full refund.
Our First Decision Point: What’s the best opening move?
- Choice A (Empathetic but firm): “I understand how frustrating that must be, Karen. Let me review our policy to see what options we have for you.”
- Choice B (Strict policy): “I’m sorry, Karen, but our policy is clear. The product is out of warranty, so I can’t offer a refund.”
- Choice C (Immediate appeasement): “I’m so sorry for the trouble. Let me process that full refund for you right away.”
Each of these choices feels like a real possibility, right? And each one will send the learner down a completely different path with its own set of consequences and follow-up decisions.
Your goal is to map out every significant path. This includes the ‘ideal’ path that demonstrates mastery, but just as importantly, you need to plan the ‘safe-fail’ paths where learners can make mistakes.
These “wrong” paths are where so much of the real learning happens.
Keeping Your Map Organized
Once you start adding more choices, your map can get complicated fast. A scenario that starts with three choices might branch into nine or more possibilities before you know it. This is where planning ahead will save you a massive headache later.
Here are a few tricks I use to keep the complexity manageable:
- Converge Paths: Not every branch needs a unique ending. Sometimes, two different bad choices can lead to the same outcome. For instance, both being too strict (Choice B) and being too lenient (Choice C) might result in a follow-up conversation with a manager. Bringing paths back together makes your scenario much easier to build.
- Limit the Depth: A great scenario doesn’t need ten layers of decisions. Often, three or four well-designed decision points are more than enough to teach the core lesson effectively.
- Color-Code Your Outcomes: On my whiteboard maps, I use different colored sticky notes for different types of outcomes. Green for ideal outcomes, yellow for acceptable-but-not-perfect results, and red for negative consequences that need coaching.
This visual map is your most important tool in the entire design process. Take your time with it. Walk through each path from the learner’s perspective. Ask yourself if the choices feel real and if the consequences make sense. A strong map is the foundation for a branching scenario that not only engages learners but truly helps them grow.
Writing Choices and Feedback That Actually Teach
With your visual map in hand, it’s time to breathe life into your scenario. This is where we move from architect to storyteller, focusing on the script, the heart and soul of the entire experience. Truly great writing can make even the simplest scenario feel real and impactful.
The words you choose for your dialogue, choices, and especially your feedback are what will stick with your learners long after they’ve clicked the final button. Let’s make sure they stick for the right reasons.

Crafting Choices That Reflect Reality
One of the biggest traps I see designers fall into is writing choices that are just too obvious. Real life is rarely black and white, so your scenarios shouldn’t be either. Avoid the classic “good, bad, and ugly” options where the right answer is practically waving a flag.
Instead, your goal is to create choices that present a genuine dilemma. Each option should feel plausible, even if some are less effective than others. This forces learners to pause and think, weighing the pros and cons of each path. This is exactly the critical-thinking skill we want to build.
Let’s jump back to our customer service agent dealing with that out-of-warranty refund request.
- Choice A: Offer empathy but stick to the policy, exploring other helpful options.
- Choice B: Firmly state the policy without offering any alternatives.
- Choice C: Immediately give in to the customer’s demand for a full refund.
All three are realistic responses you might actually see in a call center. An inexperienced or pressured agent could easily pick B or C. That realism is what makes the decision meaningful.
The most powerful choices are the ones that reflect the gray areas of the real world. They challenge the learner to think critically about the situation instead of just trying to guess the “correct” answer.
The Art of Giving Feedback That Teaches
Now, let’s talk about the most crucial part: the feedback. This is where the real learning happens. A simple “Correct!” or “Incorrect!” is a massive missed opportunity. Your feedback needs to do so much more. It absolutely has to explain the why behind an outcome.
Truly effective feedback accomplishes a few key things:
- Explains the immediate consequence. What happened right after the learner made their choice? Did the customer calm down or get even angrier?
- Connects to the bigger picture. Why did that consequence happen? How does this one decision ripple out to impact the business, the customer relationship, or team morale in the long run?
- Provides actionable advice. What could the learner do differently next time? Give them a clear takeaway they can apply on the job tomorrow.
This approach transforms a mistake from a point of failure into a powerful moment of insight. It reinforces good decisions and gently course-corrects without making the learner feel judged or discouraged.
Examples of Great Feedback in Action
Let’s break down what effective feedback looks like for our customer service scenario. Imagine the learner chose to immediately give a full refund to the angry customer.
Weak Feedback:
“Incorrect. You shouldn’t have given a refund.”
This is useless. It tells the learner what they did wrong but gives them zero insight into why. It’s a dead end for learning.
Strong Feedback:
“While providing the refund did resolve the immediate conflict, this choice could set a difficult precedent. Giving refunds for out-of-warranty products might lead to increased costs and other customers expecting the same treatment down the road. A better approach is to first show empathy and then explore solutions that align with company policy, like offering a discount on a new product. This can preserve both the customer relationship and business integrity.”
See the difference? The strong feedback explains the long-term consequences and provides a clear, alternative strategy. It’s coaching, not just grading. When you design branching scenarios in courses, making this shift in how you write feedback will have the biggest single impact on your learners’ development.
Choosing Your Tools and Building the First Draft

With your map and script ready to go, the real fun begins: bringing your branching scenario to life. The great news is you don’t need to be a developer to build something powerful. The right authoring tool can make this whole process feel less like a technical chore and more like a creative project.
You have a ton of options, ranging from surprisingly simple text-based tools all the way up to full-blown e-learning software. Your choice really comes down to three things: your budget, your technical comfort level, and the complexity of the scenario you’ve designed.
Finding the Right Authoring Tool
For simpler, text-heavy scenarios, you can get started with tools you probably already use. I’ve seen some incredibly clever scenarios built with nothing more than Google Forms or even PowerPoint using hyperlinks between slides. A free tool called Twine is also fantastic for this. It’s designed for creating interactive, nonlinear stories and doesn’t require any coding.
But when you need more horsepower for things like custom visuals, complex logic, and scoring, you’ll want to look at dedicated e-learning authoring tools. Software like Articulate Storyline and Adobe Captivate are industry standards for a good reason. They give you granular control over variables, states, and media integration, which is exactly what you need for rich, immersive experiences.
If you want to do a deeper dive into the options, our guide on the best authoring tools for e-learning breaks down the pros and cons of the top players.
Here’s a quick way to think about it:
- Simple & Free: Best for text-based scenarios, quick prototypes, or if you’re just dipping your toes in. Think Twine or Google Forms.
- Powerful & Paid: Ideal for scenarios with custom graphics, audio, video, and complex logic that needs to track learner performance. Think Storyline or Captivate.
As you choose your tools, it’s also worth looking outside our industry for inspiration. For instance, the strategies used with AI in Model United Nations to prepare for debates can spark fresh ideas for generating realistic dialogue or researching nuanced character perspectives for your own training.
Prototyping and Why You Can’t Skip It
Okay, listen up, because this is the single most important piece of advice in this entire section. You absolutely, positively must build a rough first draft and test it with real people. I cannot stress this enough.
I always build what’s called a “low-fidelity” prototype first. Sometimes this is just the text and choices copied into a Word document. Other times, I’ll quickly build it in Twine. The goal isn’t to make it look pretty. The goal is to see if the core idea even works.
A prototype isn’t a test of your design skills. It’s a test of your scenario’s core logic and clarity. Getting feedback at this early stage will save you countless hours of revisions later on.
Get this rough draft in front of a few people from your actual target audience. Don’t give them a long preamble or tell them what to do. Just hand it over and watch.
During this testing phase, you’re looking for answers to a few critical questions:
- Are the choices clear and unambiguous?
- Does the feedback make sense and actually land the learning point?
- Is the story easy to follow, or are people getting lost and confused?
- Are there any dead ends or frustrating loops in your logic?
This feedback is pure gold. You’ll quickly discover that a choice you thought was brilliant is actually confusing, or that a piece of feedback you wrote doesn’t have the impact you intended. Use these insights to refine your script and map before you sink a ton of time into the final, polished build.
You’ve poured your heart and soul into building a fantastic, engaging branching scenario. But how do you know if it actually worked? If you want to understand the real impact on your learners’ skills, you have to look beyond simple completion rates.
The real gold is hidden in the data behind the clicks.
Most authoring tools let you track the specific paths learners take through a scenario. This is invaluable because it shows you exactly where people are succeeding and, more importantly, where they’re getting stuck.
For instance, if you notice that 90% of your learners are stumbling at the same decision point, that’s a huge red flag. It’s a clear signal that something is off. Maybe the content leading up to that choice is unclear, or the options themselves are just plain confusing. That data gives you a precise, actionable insight so you can go back and make it better.
What to Track for Real Insight
Instead of just checking who finished, I focus on a few key metrics that tell a much richer story about what’s actually happening. By digging into these, you get a clear picture of how well your scenario is teaching the intended skill.
(For a deeper look at evaluation in general, you can also explore different ways to measure training effectiveness in your programs.)
Here’s what I pay close attention to:
- Path Analysis: Which routes are learners taking most often? Is there a popular “wrong” path that consistently lures people in? This can reveal common misconceptions.
- Decision Hotspots: Pinpoint the specific choices where learners hesitate the longest or make the most errors. These are your prime areas for improvement.
- Score per Path: If you’ve assigned point values to choices, you can see if certain paths consistently lead to lower scores. This can help you identify a specific knowledge gap.
- Time to Completion: A super-short completion time might mean someone is just clicking through. An extremely long time, on the other hand, could signal confusion.
This kind of analysis is absolutely critical in high-stakes fields. For example, research has shown that medical students using serious games with branching scenarios are more than twice as likely to make a correct diagnosis. This just underscores how powerful this design is for building skills that matter in the real world. You can read more about the findings from this medical education research on pmc.ncbi.nlm.nih.gov.
Designing Scenarios for Scale
Creating your first branching scenario can feel like a massive project, but it doesn’t have to be a one-off effort. With a little bit of foresight, you can design them for scale, making it much faster and easier to build more in the future.
The key is to start thinking in terms of reusable components. Once you’ve built one great scenario, you’ve essentially created a template you can adapt for other topics.
Don’t reinvent the wheel every time. Create a master template for your scenarios that includes your branding, feedback layouts, and core logic. This way, you can just drop in new content for future projects.
Here’s a simple, repeatable approach I use:
- Standardize Your Map: Develop a go-to structure you can rely on. A good starting point is a three-decision-point map that includes one ideal path and two common mistake paths.
- Build a Content Template: Use a simple document or spreadsheet to outline the script, choices, and feedback for each node. This keeps your writing organized and makes it incredibly easy for subject matter experts to contribute.
- Create a Library of Modular Assets: If you use characters, specific settings, or icons, create a small library of these assets. Reusing them not only saves time but also builds a cohesive look and feel across all your scenarios.
By thinking this way from the start, you turn branching scenarios from a monumental task into a regular, manageable part of your instructional design toolkit.
Common Questions About Branching Scenarios
As you start mapping out your first branching scenario, it’s totally normal for a few practical questions to surface. I’ve heard a ton of them over the years from course creators diving into this for the first time. Let’s get a few of the big ones out of the way so you can move forward with confidence.
These are the real “okay, but what if…” questions that pop up the second you move from theory to actually building something.
How Complex Does My Scenario Need to Be?
This is, without a doubt, the number one question I get. And I love answering it because the answer is refreshingly simple: it needs to be just complex enough to teach the one main thing, and no more.
That’s it. So many of us think a “good” branching scenario needs dozens of paths and a tangled web of consequences. The truth is, some of the most effective scenarios I’ve ever built had only two or three key decision points.
Your goal is to create a focused experience that helps someone master a specific skill or decision, not build a sprawling, epic adventure.
Think about it this way. If you’re trying to teach a new salesperson how to handle a specific customer objection, you don’t need to simulate their entire career. You just need to simulate that single, crucial conversation.
- Start with one problem.
- Offer two to three believable choices.
- Show the immediate consequence of each choice.
- Give clear, actionable feedback.
That simple recipe is often more than enough to create a powerful learning moment. In fact, research shows that even these smaller branching structures can drive huge learning outcomes. You can always add more layers later, but for now? Start small and focused.
What if I’m Not a Great Writer?
This one comes up a lot, and it’s a completely valid concern. Writing dialogue that sounds like a real human and crafting choices that feel authentic can be intimidating. But here’s the good news: you don’t have to be a professional screenwriter to pull this off.
Your goal is clarity and realism, not literary genius. The dialogue just needs to sound like something a person in that role would actually say. And the best way to get there is to listen to the very people you’re training.
- Sit down with your subject matter experts. Ask them for real-life examples of conversations they’ve actually had.
- Record interviews with your target learners and borrow their phrasing and terminology. Seriously, just use their words.
- Lean on AI tools as a writing assistant. You can feed it a scenario and ask for a few different dialogue options to get your creative juices flowing.
Remember, this isn’t about winning an Oscar for Best Original Screenplay. It’s about creating a believable situation that helps someone learn. Authenticity will always beat flowery prose.
How Do I Handle Click-Happy Learners?
Ah, the speed-clickers. We’ve all seen them, the learners who blast through a course just to get that completion checkmark, not actually reading or thinking. It can feel like you’ve wasted your effort, but a few smart design tricks can encourage them to slow down and engage.
One of the most effective tactics is to introduce a subtle delay or pause before revealing the feedback. It’s a simple trick, but it breaks the rhythm of mindless clicking and gives the learner a moment to reflect on the choice they just made.
Another powerful technique is to make the consequences more vivid and personal.
Instead of a bland “That was the wrong choice” message, show them the result. Maybe it’s a short video clip of a frustrated customer or an email from a disappointed manager popping up on the screen. When learners see a tangible outcome of their decision, they’re far more likely to pay attention to the feedback explaining what went wrong.
Ultimately, you can’t force someone to engage. But you can absolutely design an experience that makes it hard not to. By making the story compelling and the consequences meaningful, you give learners a real reason to slow down and actually think.


![How to Effectively Host Webinars Using OBS Studio [Guide from Expert]](https://learnstream.io/wp-content/uploads/2024/08/image-768x333.png)