Course Video Production: An End-to-End Guide
You’ve got the course outline open, the camera is on the desk, and the first recording still hasn’t happened because the question isn’t which lens to buy. It’s what the lesson needs the learner to understand, and how much production time you’re willing to spend to make that happen. That’s the part most creators learn the hard way after a few messy takes and a folder full of clips they never want to revisit.
Course video production works best when you treat it like teaching first and filming second. The gear matters, sure, but the bigger wins usually come from tighter lesson design, cleaner audio, shorter segments, and a recording process that keeps you moving instead of stuck polishing the wrong things. In practice, that means building videos learners can finish, not just videos that look impressive in a thumbnail.
What Makes Course Video Production Different
The first mistake is treating a course like a YouTube channel with a payment button attached. I’ve done that myself, and it wastes time fast. A course video has one job, carry a single lesson cleanly, fit into a sequence, and help someone move from confusion to action without extra detours.
That changes nearly every production choice. The length of the recording matters, the pacing matters, and the camera setup matters because the learner is usually there to solve something specific, not to be entertained by the edit. See the timeline and budget section below for the full statistics. What matters here is the production trade-off, cleaner lessons usually come from tighter structure and fewer distractions, even if the video looks less flashy than a marketing piece.
Teaching clarity beats polish
A marketing clip can survive a little style over substance. A course lesson can’t. If the learner loses the thread halfway through a demo, all the nice lighting in the world won’t save the outcome.
Practical rule: If a shot, transition, or music cue doesn’t help the learner understand the next step, cut it.
That’s why course video production feels closer to instructional design than content creation. You’re deciding what needs to be shown, what needs to be said, and what can be trimmed away before it ever reaches the edit timeline.
The best course creators I’ve worked alongside don’t start with gear lists. They start by deciding what the learner must be able to do at the end of the lesson. Once that’s clear, the production choices get simpler.
For course work, that usually means making trade-offs a marketing team would never make. You might choose a tighter crop so the screen recording stays readable, keep camera movement minimal so the lesson feels steady, or cut an intro that looks polished but adds nothing to the teaching point. Those choices save time later, and they make the video easier to finish.
Planning Your Course Video Before You Hit Record
A lesson that starts without a plan usually pays for it later. The recording feels productive in the moment, then the cost shows up in retakes, awkward gaps, and edits that have to rebuild a lesson that never had a clear shape.
Start with one outcome per lesson. If the learner cannot point to a clear action, concept, or decision at the end of the video, the lesson is too broad. For a topic like setting up a Stripe account, that usually means splitting the work into a few smaller wins, such as account basics, dashboard setup, and first payment settings, instead of dragging everything into one long recording.
Write the lesson like a route, not a transcript
A script does not need to sound theatrical. It needs to keep you from wandering. Research shared by the University of California, Irvine points to 130 words per minute as a usable pace for instructional narration, and shorter segments help keep attention from drifting in the first place source. That pace keeps a lesson from bloating while still leaving room to explain the step that matters.
I like to outline in this order:
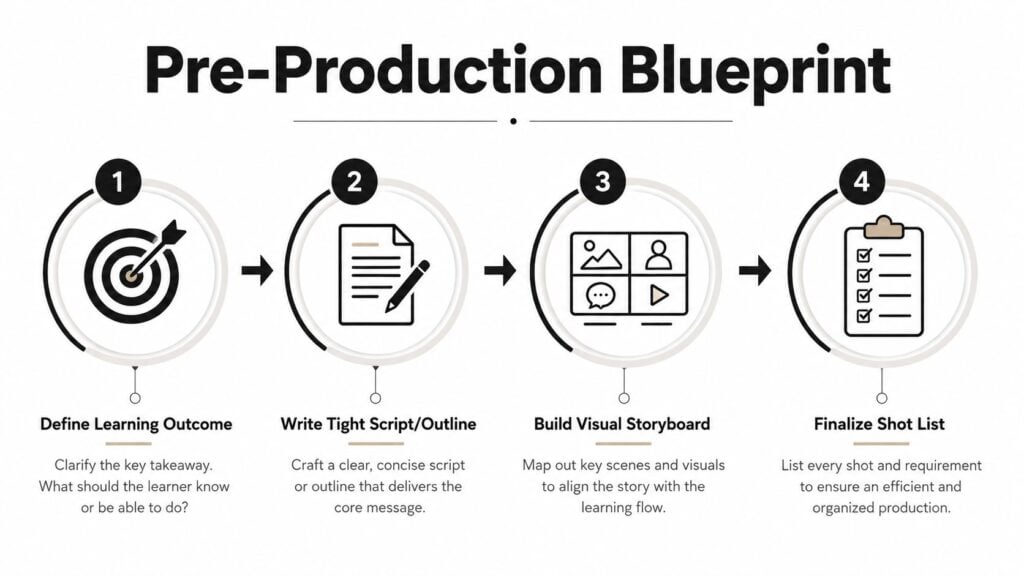
- Define the learner outcome. Write one sentence that finishes the phrase, “By the end, the learner can…”
- List the visible actions. If the learner needs to click, drag, compare, or configure something, note it.
- Write the spoken parts. Keep the script short enough that you can read it naturally without losing your place.
- Build the shot plan. Decide what gets camera time, what gets screen capture, and what can stay as a graphic.
A small test recording is worth doing before the full session. Two minutes is enough to catch bad framing, a noisy room, or a mic that is too far away. That check saves hours later, especially when you are recording a batch of lessons and do not want to discover the problem halfway through.
Break lessons into smaller teaching units
A long lesson can feel efficient to record, then become painful to edit and harder to finish. A 10-minute lesson on setting up a Stripe account often works better as three focused segments than as one stream of consciousness. One segment can handle account creation, another can cover business settings, and the last can walk through the first payment check.
The Learning Rooms recommends aiming for about 150 words per minute in finished eLearning video and keeping most lessons in the 2 to 5 minute range source. That advice matches what tends to hold attention in practice, especially when the lesson is procedural or software-based.
Plan the script, storyboard, and shot list in the same sitting. That keeps the recording day from turning into an improvisation session. If you are working on a larger build, batching the writing and recording also helps keep momentum, because you are not switching mental gears every hour.
Minimum Gear and Room Setup That Actually Works
A studio is nice. A reliable setup in a spare room is better. Most course creators don’t need cinema gear, they need a setup that records cleanly, repeats easily, and doesn’t create extra work every time they sit down.
The biggest early decision is whether the course is mostly talking-head, screen-recorded, or mixed. A talking-head lesson can get by with less gear than a software demo, while a screen-heavy course needs cleaner workflow planning so your captures stay readable. If you’re building software lessons, this is also where a tool stack like the screen recording options covered in LearnStream’s best screen recording software for course creators starts to matter.
Compare the basics by course type
| Component | Starter (under $300) | Standard ($300-$800) | Premium ($800+) |
|---|---|---|---|
| Microphone | USB mic | External USB or lav mic | Higher-end external mic with cleaner gain control |
| Camera | Webcam | Better webcam or entry mirrorless camera | Mirrorless camera with lens flexibility |
| Lighting | One key light | Key light plus simple fill | Three-point style setup |
| Recording space | Quiet corner with soft furnishings | Dedicated spare room setup | Treated room with repeatable layout |
| Screen capture | Native screen recording | Dedicated screen recording tool | Screen capture plus external monitoring |
A USB mic is often the smartest entry point if you’re alone and recording at a desk. A lav mic works better when you want to move a bit or stand while teaching. For video, a decent webcam that outputs clean 1080p is enough for many courses, while a mirrorless camera makes more sense if your face is part of the lesson brand and you want more control over depth and framing.
Practical rule: Spend on audio first, then lighting, then camera.
The room matters more than people expect. A quieter room with curtains, a rug, and soft furniture usually beats a brighter room with echo. If you can keep one corner permanently set up, you’ll record more often because you won’t spend 20 minutes rebuilding the scene each time.
For demo-heavy courses, a capture card becomes useful when you need a more stable signal from an external device or want to route a cleaner feed into your recording workflow. For simple screen shares, it’s easy to overspend before you’ve even tested whether your audience needs that extra polish.
Camera Angles, Lighting, and Audio on Recording Day
Recording day is where a lesson either holds together or turns into cleanup work. Camera angles, lighting, and audio all do the same job, they help the learner follow what you’re teaching without friction. If one of them is weak, the lesson feels harder to trust.
Let instructional clarity guide your camera choice rather than cinematic conventions. A wide shot helps when the learner needs to see posture, a desk setup, or the relationship between multiple objects. A medium shot usually works best for direct teaching, and a close shot earns its place when you need emphasis or a detailed hand movement. The point is to match the frame to the task, because every lesson has a different teaching goal.
Keep the lighting simple and repeatable
A basic three-point setup can be simplified for one person. One key light usually does most of the work, and a second softer light or reflector can help balance shadows. The common mistakes are lighting that’s too harsh, a face that sits too close to the background, and mixed color temperatures that make skin tones look strange on camera.
Columbia’s guidance on effective video production recommends a quiet, well-lit setup and a quality microphone to reduce background noise and rework source. ETH Zurich also recommends HD recording at 1920×1080 for videos that can be viewed fullscreen without major quality loss source. That is a practical target for course creators, because it gives enough clarity for most teaching screens without pushing the workflow into heavier formats.
Audio deserves the most attention
The single most important part of course video production is still audio. If learners can’t understand you, they leave. If the room hums, the mic clips, or the voice sounds distant, the lesson feels unfinished even when the visuals are strong.
A few rules make a big difference:
- Place the mic close enough to reduce room sound. A lapel mic should sit stably, not swing around on clothing.
- Record in the quietest room you have. Turn off fans, loud appliances, and anything that adds a constant tone.
- Watch your peaks while recording. Keep them around -12 to -6 dBFS so you don’t force clipping into the track source.
- Use everyday soft materials to tame echo. Curtains, bedding, and fabric furniture all help more than people expect.
If you want more practical recording ideas for lean teams, the sound tips for small teams article is a useful companion. Clean sound buys you more goodwill than flashy visuals ever will.
For a typical lesson, a two-shot setup can work well. Record a talking-head intro, then cut to the screen or demo view while keeping a lav mic on the speaker the whole time. That avoids the awkward jump between modes and keeps the lesson feeling steady. If your course includes a lot of screen work, a comparison of screen recording software for course creators can help you choose a tool that fits your workflow without adding extra friction.
Editing Your Course Video for Tight, Clear Lessons
A good course edit usually removes more than it adds. The job is to clear out the parts that slow learners down, then keep enough structure so the lesson still feels guided and easy to follow. If you cut it like a highlight reel, the result may look busy while becoming harder to learn from.
Start with the obvious cuts. Remove false starts, long pauses, repeated phrases, and any stretch where you were hunting for the next thought. Then tighten the pacing so each idea moves forward without extra connective tissue. Jump cuts are fine here, as long as they keep attention on the teaching and do not create visual clutter.
Edit for comprehension, not style points
B-roll and screen recordings earn their place when they clarify a step that would otherwise need a reshoot. If you misstate a menu path or need to show the interface instead of the face camera, swapping in a screen capture is usually faster than trying to force a perfect live take. That is one of the places where the teaching decision matters more than the polish decision. The edit should make the lesson easier to follow, not just nicer to look at.
For creators who want a broader view of lesson structure and pacing, the how to create engaging online course videos guide is a useful reference alongside your edit pass.
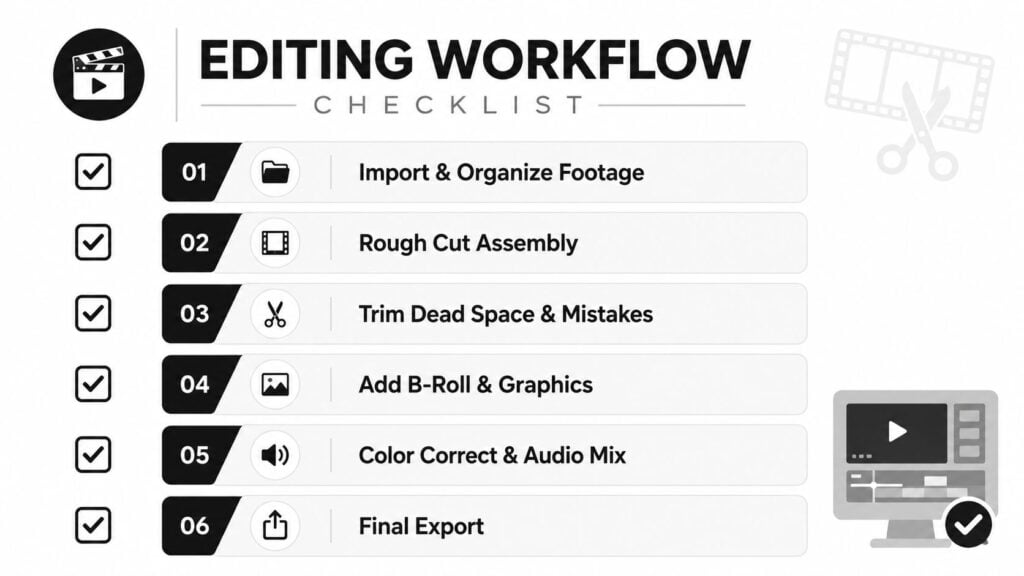
The editing flow I use is simple:
- Import and organize the footage.
- Build a rough cut from the strongest take.
- Trim dead space, mistakes, and repeated ideas.
- Add screen captures, overlays, or graphics where they help the learner.
- Normalize audio, correct color, and check captions.
- Export the final lesson for playback.
For the file itself, a solid baseline is H.264 MP4 at 1080p and roughly 8 to 10 Mbps. That combination is a practical balance for LMS playback, especially when learners are on slower connections and still need the video to load smoothly. Final audio should sit at a consistent level across lessons so one module does not feel louder than the next.
Caption cleanup deserves real attention. Automated captions often miss product names and homophones, so I always proofread them manually. If your lesson is software-heavy or uses specialized terms, do not assume the machine got it right. Small caption errors make a course feel sloppy faster than most creators expect, and that hurts trust even when the teaching is solid.
A minor sync drift between audio and video usually comes from variable recording conditions or mismatched source files. Fix it early in the timeline before you build the rest of the edit around it. A slightly imperfect cut is easier to forgive than a lesson where the mouth and voice do not line up.

Captions, Encoding, and Hosting for Real Learners
A finished edit still isn’t the finish line. Learners need a file they can understand, play, and revisit without friction. That’s where captions, encoding, and hosting choices start to matter as much as the camera work.
Captions and transcripts belong in every course workflow. They help learners who are Deaf or hard of hearing, and they also support people in noisy environments or anyone watching with the sound off. The practical bonus is searchability inside a course platform, which makes it easier for learners to find the exact point they need later.
Clean the text before you publish it
Auto-generated captions are fine as a first pass, but they need cleanup. Course terminology, software names, and technical words are where transcription tools tend to miss. If you’re turning a video into text, the video to text transcription guide from Voice Control Pro is a useful reference for tightening that workflow.
Captions aren’t decoration. They’re part of the lesson.
For distribution, you’ve got a few common paths. Self-hosting gives you control, a dedicated video platform gives you a stronger streaming layer, and an LMS player keeps everything in one place. The right choice depends on how much you care about playback speed, analytics, and whether you want video data sitting inside your own stack or somewhere else.
The hosting decision should match your course model, not your ego. If you’re running a premium course with long-term access and frequent updates, platform reliability matters more than saving a small amount on hosting. If you want everything centralized inside your LMS, that can simplify support and reduce link friction for learners.
For creators comparing the trade-offs, LearnStream’s guide to video hosting platforms for online courses is worth a look because it frames the options in practical course-building terms rather than generic marketing language.
Realistic Timelines, Budgets, and Repurposing Your Course Video
The cleanest way to plan course video production is as a batch process. Planning, recording, editing, and publishing each need their own window, and they do not need to happen on the same day. As noted earlier, the average course runs 8 to 12 hours and costs $1,200 to $5,000 to produce (source). That range is a reminder that this is a real production job, not a weekend side project.
A practical schedule starts before the camera turns on. I like to spend the first block writing outcomes, scripts, and shot plans, then record in grouped sessions, then finish with editing and distribution. Batching matters because every setup change burns time, especially when you are switching between talking-head lessons, screen recordings, and b-roll. The more similar the lessons are within a session, the faster you move and the fewer tiny mistakes you have to fix later.
A budget should match the course type
The spending range is useful because it reflects different production choices, not just different price tags. A lean course can start with a basic setup and careful editing. A more polished course may need better audio gear, lighting, and outside edit help. The same source puts course creation cost at $1,200 to $5,000, with editing often adding $500 to $2,000 (source).
That range makes sense once you separate teaching value from visual polish. A software course built around screen captures can stay lean if the interface is clear and the pacing is tight. A talking-head leadership course usually needs more attention to lighting, framing, and edit rhythm because the instructor’s presence carries more of the lesson. In both cases, money spent on clarity tends to pay back better than money spent on gear that looks impressive but does not help the learner.
The fastest way to stretch a fixed budget is to record more than one use for the same session. One recording day can produce the lesson itself, a short teaser for your course page, several clipped segments for social posts, and email material that sends people back to the module. That does not mean squeezing every scrap of footage into marketing. It means planning enough clean material that the same setup serves the course and the promotion work around it.
Batching beats improvising. When I have tried to produce lessons one by one, setup time kept eating the day. When I grouped similar lessons together, the work got faster and the edits got cleaner.
Repurposing only works if the original lesson is built with reuse in mind. Wide, stable framing makes a clean teaser easier to cut. A good audio track gives you clip-ready material without extra cleanup. If a lesson still falls apart in edit, re-shoot the broken section or split the idea into a smaller lesson. A course gets stronger when each module has one clear job, and that is easier to protect when you cut weak material instead of trying to save it.
A simple launch workflow is enough for most creators. Finish the video, clean the captions, upload it to your hosting path, then mark the lesson for reuse. That keeps the course moving while also building a library of supporting clips you can use later without starting from zero.