Course Welcome Email Guide That Converts
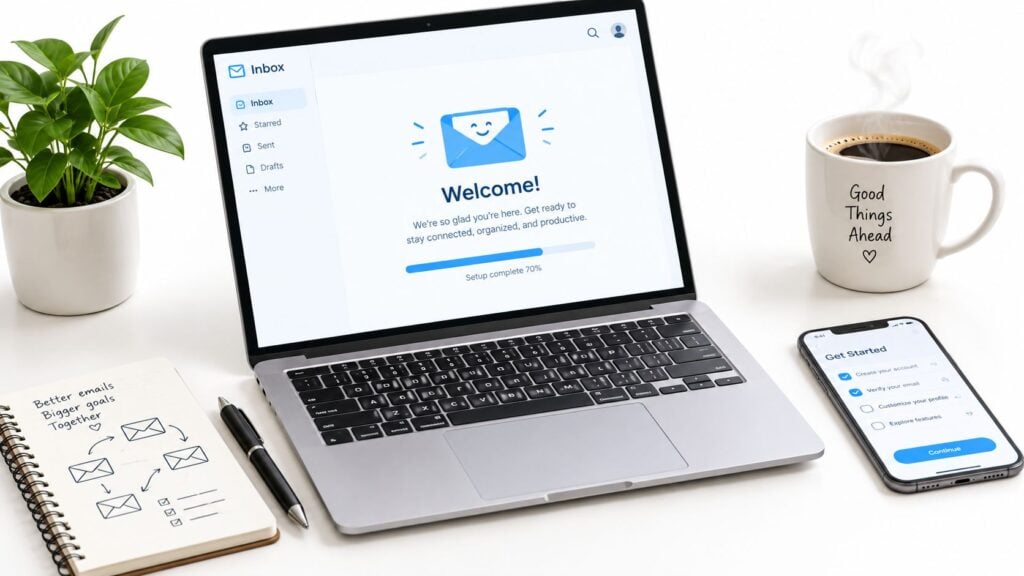
A new learner has just paid for your course. They’re excited, but they’re also checking their inbox with a practical list of questions. Where’s the login link? Which lesson comes first? How much time should they set aside? Who do they contact if something breaks?
That first message has a job beyond saying hello. A well-built course welcome email connects the purchase to the learning experience, removes uncertainty, and points the learner toward a first useful action. Welcome messages are among the strongest-performing onboarding emails, with industry benchmarks reporting open rates around 50% and click-through rates near 14.4%, compared with about 2.7% for other email types (welcome email benchmark data).
The mistake I see most often is treating that performance as proof that one greeting is enough. Your first email should begin a short, behavior-based onboarding journey. It should deliver what the learner needs immediately, then give them a clear reason to return.
The Moment a New Learner Hits Signup
The payment goes through. The confirmation page loads. For a few seconds, the learner feels the pleasant relief of having finally started something they’ve been thinking about.
Then the questions arrive.
They search for an access email. They wonder whether they need to create a separate password. They look at the course dashboard and try to work out whether the first module is the right place to begin. If the course is self-paced, they may also wonder how quickly they’re expected to move. If it’s a cohort program, they’re checking dates, community details, and support arrangements.
I’ve learned to treat this moment as a handoff. The checkout has completed the transaction, but the course welcome email has to begin the experience.
A useful first message answers the immediate questions in the order they appear:
- You’re enrolled.
- Here’s how to access the course.
- Start with this specific lesson or task.
- Here’s what happens next.
- Contact us here if you need help.
That sequence matters because uncertainty creates friction before the learner has done any work. A vague welcome note can leave someone hovering at the entrance. A clear one gets them into the course while their motivation is still fresh.
Practical rule: Write the first email for a learner who has never seen your platform before, even if your sales page explained everything clearly.
Welcome emails also create an expectation for the rest of the relationship. A calm, direct message suggests that the course will be organized. A cluttered email full of unrelated offers suggests the opposite. The first touchpoint should make the next step feel obvious, then the follow-up sequence can help the learner keep moving.
The Five Building Blocks of a Course Welcome Email
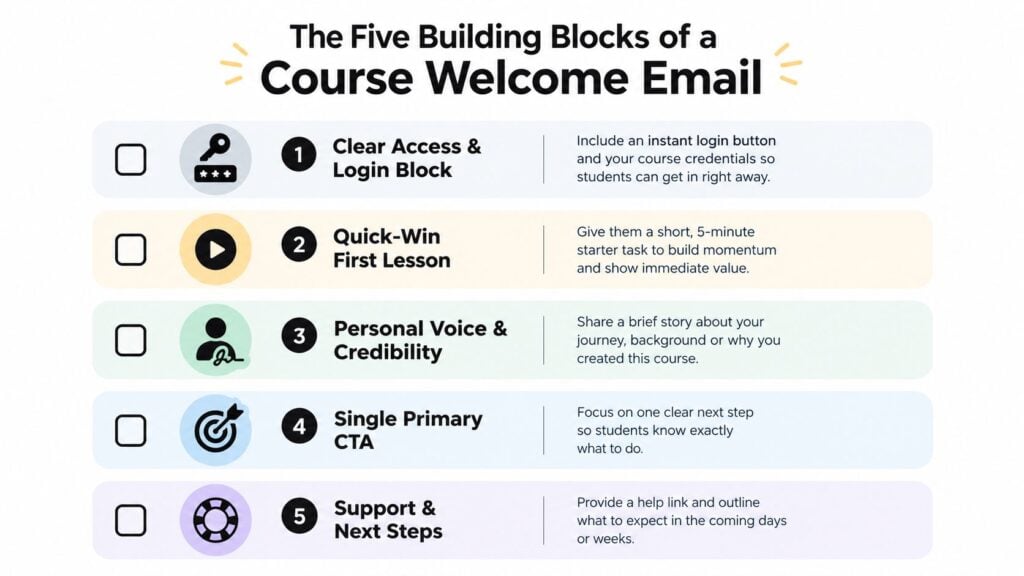
A reliable welcome email structure has five building blocks. They work for a short mini-course, a self-paced program, or a cohort with live support.
1. Clear access and login details
Put access information near the top. Include the course URL, the login instruction, and a recovery option if one exists. Don’t make a new learner search through a paragraph to find the button.
A simple pattern works:
Your access: Log in here: [Start the course]. Use the email address you used at checkout. If you haven’t set a password yet, choose “Forgot password” on the login page.
2. A quick-win first lesson
Give the learner one manageable action. It could be watching the opening lesson, completing a short reflection, downloading a worksheet, or posting an introduction in the community.
The action should feel achievable rather than ambitious. “Complete the first five lessons” creates a project. “Watch the welcome lesson and write down your main goal” creates momentum.
3. Your personal voice and a credibility cue
Learners want to know who’s guiding them. Add a short note about why you built the course or what experience shaped it. Keep it relevant and restrained.
For example:
I created this course after helping small teams turn scattered ideas into practical launch plans. You won’t need to master everything at once. Each lesson gives you one decision or action to work through.
That kind of credibility feels more useful than a long biography.
4. One primary call to action
Choose one main button. “Log in and start lesson one” is clearer than a row of links to the dashboard, a podcast, a sales page, a community, and a bonus library.
You can include support links below the main action, but the email should have one obvious destination. Multiple competing CTAs make the learner decide what you could have decided for them.
5. Expectations about pacing and support
Tell learners how often they’ll hear from you, whether the course is self-paced, and where support lives. This reduces the feeling that they’ve missed something.
A useful closing might read:
New lessons are available now, and I’ll send a few short check-ins over the next two weeks. Work at your own pace, and send questions through the support form if you get stuck.
For wider context on how course creators can use email across the learner lifecycle, see this guide to email marketing for course creators.
Subject Lines That Actually Get Opened
The best subject line usually tells the learner what just happened or what they can do next. Cleverness has its place, but the first touchpoint benefits from clarity.
Here are five patterns I use when drafting a course welcome email subject line.
| Pattern | Generic Example | Improved Version | Best For |
|---|---|---|---|
| Access now | Welcome to the course | Your course access is ready | Self-paced enrollment |
| First-name hook | You’re in | {{first_name}}, your first lesson is ready | Personalized onboarding |
| Specific outcome | Start learning today | Start building your first project | Practical skills courses |
| Cohort timeframe | The course begins soon | Your Monday cohort starts here | Cohort launches |
| Plain confirmation | Thanks for joining | Enrollment confirmed, start here | Transaction-led first emails |
The access-now opener works because it matches the learner’s immediate question. A personalized subject line can make the message feel more deliberate, but only use a first name when your form reliably captures it. A missing merge value is worse than a plain subject.
Curiosity should connect to a real outcome. “Your next chapter starts now” sounds polished but tells the learner nothing. “Create your first lesson plan today” gives the subject a concrete reason to open.
For a cohort, mention the relevant timing without manufacturing pressure. Learners need to know when participation matters, especially if live sessions or group work are involved.
A simple test you can run
Test one meaningful difference at a time. Compare a direct access subject with an outcome-led version, while keeping the email body and send conditions the same. Don’t decide on a winner from a tiny audience or from an early burst of opens.
The available benchmark material reports welcome-email open rates around 50% to 65%, with education welcome messages commonly benchmarked in that range and click-through rates around 12% to 20% (education welcome-email benchmarks). Use those figures as context, not as a promise. Your real winner is the subject line that leads to more logins and first lessons, not just more opens.
Timing Your First Touch and the Follow Up Sequence
Send the first email as soon as the enrollment event is confirmed. Guidance for onboarding commonly recommends an immediate touchpoint, with some frameworks placing delivery within 5 minutes of signup (onboarding email timing guidance).
I use a four-touch sequence that responds to learner behavior rather than sending the same message to everyone.
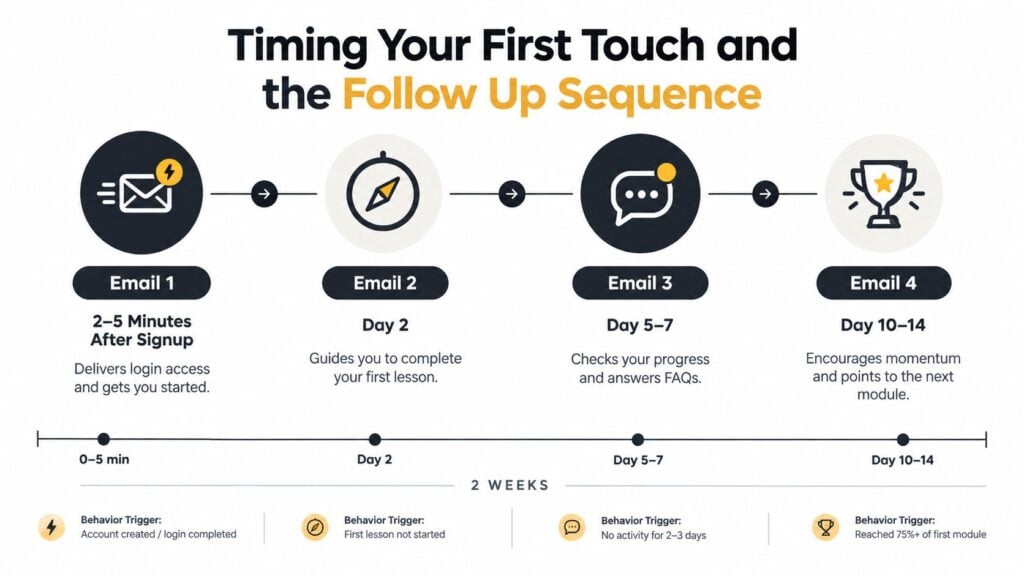
Email one, within 2 to 5 minutes
Deliver access, login instructions, the first action, and support details. This message should stand on its own if the learner never opens another onboarding email.
If the platform sends a separate billing receipt or account confirmation, suppress duplicate payment language from this message. The welcome email should focus on starting the course.
Email two, around day 2
Use a login trigger. If the learner hasn’t accessed the course, send a short nudge that repeats the access path and offers help. If they’ve already logged in, skip this version and send a progress-oriented message instead.
The point is to remove a barrier, not to create another notification for someone who has already started.
Email three, around day 5 to 7
Surface one specific lesson, exercise, or quick win. A learner who has logged in may still need help choosing what to do next. Point them toward the next useful step and answer a common question before it becomes a support ticket.
Keep the message content-focused. Avoid inserting an unrelated pitch while the learner is still finding their footing.
Email four, around day 10 to 14
Encourage continued momentum. Introduce the community, invite a progress reply, highlight a relevant learner conversation, or point toward the next module. If the learner has already advanced beyond that stage, skip the beginner prompt and acknowledge their actual progress.
A sequence like this works best when every email checks the learner’s current state first. Suppress messages when a learner has unsubscribed, requested access help, received a billing or password email, or already completed the action being promoted.
For a broader look at the role of email in course retention and enrollment, refer to this resource on platform choices for selling online courses.
Transactional First or Promotional First
I recommend making the first welcome email transactional in purpose, even if the course launch team is eager to promote a bonus, upgrade, or related product.
The learner has just made a purchase or completed an enrollment action. They’re expecting access information. Adding a large promotional block at the top can obscure the thing they opened the email to find. It also mixes two different expectations, delivery and persuasion, in a relationship that has barely started.
Marketing-heavy language can create deliverability problems when it dominates a new customer message. Inbox providers may route messages to Promotions or Spam, and poor engagement can weaken the signals associated with later sends. Compliance also becomes harder when promotional material is bundled into a message without making the marketing purpose clear. CAN-SPAM and GDPR obligations vary by situation and location, so creators should obtain appropriate legal advice for their audience and business model.
| Signal | Transactional First | Promotional First |
|---|---|---|
| Main purpose | Deliver access and orientation | Sell an upgrade or offer |
| Learner expectation | Login and first step | Marketing content |
| Primary CTA | Open the course | Buy, upgrade, or claim |
| Inbox risk | Clear relevance | Mixed intent and possible filtering |
| Follow-up role | Builds orientation | Handles the pitch separately |
The practical split is straightforward. Keep the first message centered on access, login, and one next step. Put the upsell, bonus offer, or launch promotion into a clearly labeled follow-up after the learner has had time to identify the course and interact with your emails.
Benchmark guidance places online-course onboarding open rates around 50% to 65%, click-through rates around 15% to 22%, and activation rates around 20% to 35% (online-course onboarding benchmarks). Those figures support a delivery-first approach, but they don’t establish a legal safe harbor. Clear consent, accurate identification, relevant content, and an easy unsubscribe process still matter.
Setting This Up in Your Course Platform
The exact menus vary, but the build logic stays consistent. Trigger the first message from enrollment, personalize the useful details, and make later emails conditional on behavior.
Teachable
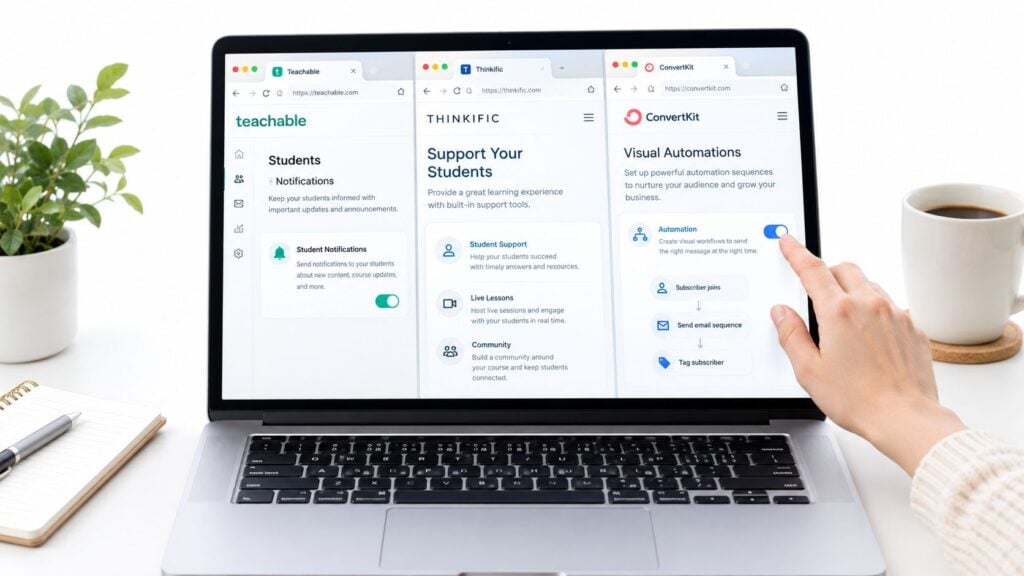
In Teachable, go to Students, then Notifications, and enable student emails. Map the welcome message to the New enrollment event so the email fires when the learner enters the course.
Use the available first-name merge field, shown here as {{student.first_name}}, in a greeting or a sentence near the opening. Before activating the automation, test the message with a real enrollment and check the access link from a logged-out browser.
A practical Teachable message might open with:
Hi {{student.first_name}}, you’re enrolled. Use the button below to enter the course, then begin with the orientation lesson.
Keep receipts and account notices separate where the platform allows it. Learners shouldn’t have to distinguish three versions of the same confirmation.
Thinkific
Thinkific users can customize the enrollment message through Sites, then Email templates, and then the Enrollment confirmation template. Add Liquid fields such as {{ user.first_name }} and {{ course.title }} so the email identifies both the learner and the course.
Thinkific doesn’t natively provide a full multi-step welcome drip in the same way a dedicated automation tool does. If you need behavior-based follow-ups, connect the enrollment event to an external email platform through Zapier, then pass the relevant course and learner information into the sequence.
Test the Liquid fields before sending. A merge tag that renders blank or appears as raw template text can make an otherwise polished email look unfinished.
ConvertKit
In ConvertKit, create a visual automation triggered by Course enrollment or by a tag applied after successful enrollment. Connect that trigger to a four-email sequence with these delays:
- Immediately: Send access instructions and the first action.
- 1 day after: Check whether the learner has logged in, then send the appropriate nudge.
- 5 days after: Point toward a useful lesson or activity.
- 10 days after: Encourage progress and introduce the next support step.
For personalization, use {{ subscriber.first_name | default: "there" }}. The default value matters because not every subscriber will provide a first name.
If you’re connecting a platform to a custom signup or enrollment workflow, this guide on how to integrate email API can help you think through the handoff between your application and email service. For a wider platform comparison, LearnStream also covers platforms for selling online courses.
Before launch, take the course yourself. Then ask someone unfamiliar with the setup to enroll, log in, and follow the sequence. A fresh pair of eyes catches broken links, missing fields, and confusing instructions that the creator often reads past.
What to Measure After You Hit Send
Open rate is useful, but it isn’t the finish line. Preview panes and Apple Mail Privacy Protection can inflate opens, so I treat them as a diagnostic signal. A learner who opens the email but never logs in hasn’t reached the outcome the sequence exists to support.
Start with delivery and complaints. The practical targets in the setup brief are a delivery rate above 95% and a spam complaint rate below 0.1%. Those figures don’t prove that the sequence works, but they help protect the sender relationship while you investigate the learner experience.
Then track the actions that connect the inbox to the course:
- Click-to-login rate: Shows whether the email sends learners to the right access point.
- Time to first lesson: Reveals how quickly the welcome message turns intent into activity.
- Day 7 module completion: Shows whether the learner has moved beyond the initial visit.
- Day 14 module completion: Helps identify whether the sequence supports continued momentum.
- Unsubscribe rate: Flags content that feels irrelevant, excessive, or overly promotional.
The broader benchmark picture is encouraging but varied. Automated welcome emails have been summarized at an average open rate of 35.53%, while other onboarding benchmarks cluster around 40% to 60% open rates and 10% to 25% click-through rates (welcome email series benchmarks). For education specifically, benchmark summaries report welcome opens in the 50% to 65% range and conversions around 5% to 10% (education email benchmarks). Use these ranges for orientation, then compare your own batches against themselves.
| Metric | Beginner | Average | Strong |
|---|---|---|---|
| Open rate | Below your recent baseline | Within your recent baseline | Above your recent baseline |
| Click rate | Some access clicks | Consistent course access | Strong first-action response |
| Login conversion | Learners open but hesitate | Learners regularly enter | Most engaged readers reach the course |
| Completion rate | Early drop-off | Steady movement | Learners continue through the roadmap |
| Unsubscribe rate | Noticeable increase | Stable and controlled | Low, with relevant targeting |
For a practical explanation of inbox placement, authentication, and sender reputation, read this guide to what email deliverability means. For course-specific retention analysis, use this resource on retention metrics.
Review the sequence once a week. Pull the numbers from your course and email dashboards, compare them with the previous batch, identify the largest drop between email and lesson activity, and change one element. Test the subject line, the access button, the first lesson, or the trigger logic, then run the sequence again.
Build your next course welcome email around one clear first action, send it immediately after enrollment, and connect it to behavior-based follow-ups. Test the complete learner journey yourself before the next enrollment opens, then review login and lesson activity after each batch so your onboarding improves with every group.