Setting Up a YouTube Channel for Online Educators
You can have a decent microphone, a clean banner, and a channel name you like, and still feel stuck the moment you open YouTube Studio. That’s usually the moment educators realize the work starts before the first upload, because the setup choices shape who can manage the channel, how you measure progress, and whether your first videos help sell a course or build trust with students.
I’ve seen this pattern across creator workflows again and again. The people who move fastest are rarely the ones who obsess over tiny branding tweaks first. They’re the ones who set up the account structure, verify the right features, and build a measurement habit before they ever get attached to a topic that may or may not have demand.
Why Most YouTube Setup Guides Fail Educators
Most setup guides stop at the visible stuff. They show profile pictures, banners, and where to click, then act like the channel is ready because the homepage looks polished. That leaves educators with a channel that looks complete but behaves like a half-built classroom.
The bigger issue is that a modern channel setup is also a workflow decision. YouTube Studio is where creators check performance, and the Analytics area gives a default view of views, watch time, subscribers, and revenue. That matters because setup now includes a measurement system from day one, not just a place to upload videos. If you want useful feedback, you need to look at the first signals soon after publishing, then adjust thumbnails, titles, and topic choices while the data still reflects the original upload. YouTube Studio analytics overview
The first technical choice is usually the wrong one
A lot of guides push you straight into naming and visuals, but the first meaningful decision is whether the channel should live inside a personal channel or a Brand Account. That choice affects permissions, later delegation, and how easily you can hand work to an editor, assistant, or co-instructor without rebuilding everything later. YouTube’s official flow lets you create a new channel or choose an existing Brand Account, and if that Brand Account already has a channel, you can’t create another one under it. YouTube channel creation and Brand Account flow
For educators, that matters more than it does for hobby channels. A course creator might start solo, then bring in someone to manage uploads, thumbnails, or community replies. If the account structure is wrong at the beginning, the workaround later is usually messier than the original setup.
Practical rule: set up the ownership structure for the team you expect to have later, not only the one you have today.
The other thing most basic guides miss is strategy. If you’re building a teaching business, the channel should support course enrollments, lead capture, and credibility, not just views. That’s why the boring setup work is the foundation.
Creating Your Channel with the Right Account Structure
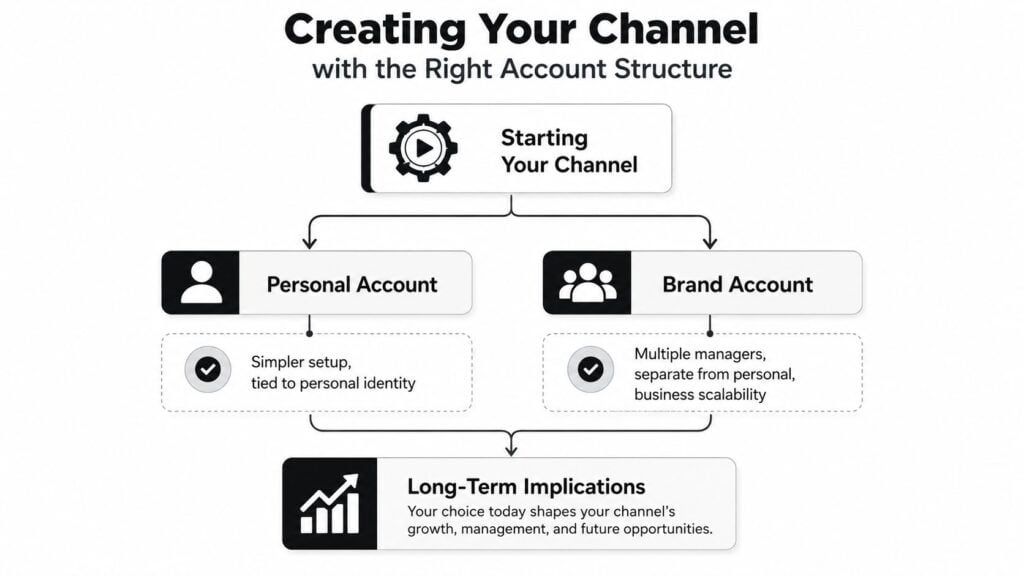
Start with the ownership model, because that choice affects who can manage the channel later and how much friction you create for yourself as the channel grows. A personal channel is tied to one identity and is easy to launch. A Brand Account makes more sense if you expect an editor, assistant, or co-instructor to help with uploads, comments, or future handoff. The setup flow supports both, and the decision sits at the center of the channel architecture. Create or choose a YouTube channel
The click path is simple, the prep work is where people slip
The basic creation flow is straightforward. Sign in to YouTube, click the profile icon in the top right, choose Create a channel, then enter a channel name or handle and confirm. If the channel is tied to your own name, the identity is obvious. If it will support a teaching business, a brand name usually gives you more room to grow and delegate without reworking the public face later. How to start a YouTube channel
The setup screen goes faster if the public identity is already decided. YouTube asks for a profile picture, channel name, and handle before the channel is live, so I always tell educators to settle those pieces before they open the form. If you create the channel first and sort out the branding later, you end up editing the public identity while you should be planning the first uploads.
For profile pictures, the setup checklists I trust point to either 800 × 800 pixels or at least 98 × 98 pixels, and channel banners should be at least 2560 × 1440 pixels for proper display across surfaces. Channel setup checklist with image sizes
There is a real trade-off here. A face-based channel can build trust faster for educators, especially if you sell coaching or a personality-led course. A logo-based channel can feel more like a studio or school brand, which works better when several people may handle the content over time.
Before you finish the setup, choose whether the channel should read as a person teaching or a brand teaching. That decision shapes thumbnails, channel art, and how students remember you after they leave YouTube.
Validating Your Channel Topic Before You Commit
A polished channel with a weak topic still struggles. That’s why I’m wary of the usual advice to “just pick something you like” and start uploading. Interest helps, but educators also need repeatable demand, enough room to stand out, and a topic that supports products or services they can sell.
Narrow topics usually win because they’re easier to remember
One useful guideline from creator strategy is simple, if a channel can be described in one clear sentence, it usually has a better chance of positioning well than a vague broad-topic channel. That idea shows up in niche advice because broad channels often feel unfocused, while a specific teaching angle gives viewers a clear reason to subscribe. The question is less “Can I make videos about this?” and more “Can I explain exactly who this channel is for in one line?”
I’d test three things before committing. First, search volume, because a topic with no demand won’t sustain a publishing habit. Second, competitor channels, because you want to know what already ranks and what style of teaching is already crowded. Third, comment sections, because questions in comments reveal what viewers still want answered but aren’t getting from existing videos.
A practical niche test for educators looks like this.
- Search intent: Look for phrases students type when they want help, not just broad subject labels.
- Competition shape: Check whether the top channels are all massive generalists or whether there’s room for a more specific teacher voice.
- Content gaps: Read comments on competing videos and note the repeated questions that nobody has answered clearly.
- Offer fit: Make sure the topic can naturally lead to a course, workshop, membership, or consulting offer.
That last point is where many channels drift. A topic might be fun to cover, but if it doesn’t connect to what you teach or sell, the channel becomes a side project instead of a business asset.
The best niche choices for educators usually sit where interest, expertise, and monetization overlap. That’s the version of channel setup most guides skip, and it’s the part that saves months of publishing in the wrong direction.
Branding Assets That Build Trust with Students
Students judge a channel fast. If the visuals look inconsistent, the channel feels temporary. If the visuals look deliberate, the channel feels like a real teaching business, even before the subscriber count says anything useful.
Design for recognition, not decoration
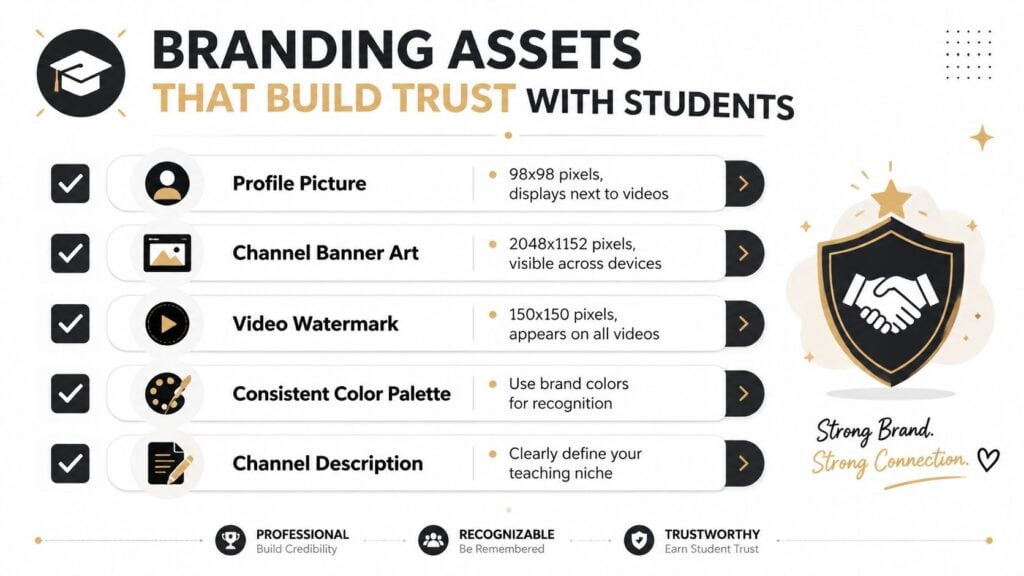
The core branding pieces are the profile picture, banner art, watermark, color palette, and channel description. A profile picture should be at least 98 × 98 pixels, a channel banner should be 2560 × 1440 pixels, and a watermark can be set so it appears on videos across the channel.
For educators, the choice between using your face or a logo comes down to trust and scale. A face usually creates a quicker human connection, which helps if you teach directly and want students to feel like they know you. A logo can work better if the brand represents a broader learning studio, especially when you plan to expand beyond your own on-camera presence.
The banner should do one job clearly, tell people what you teach. Leave out buzzwords and crowded icon sets. A student should land on the channel and understand the topic in a second or two.
A few branding mistakes keep showing up:
- Inconsistent visuals: Random colors and mismatched typography make the channel feel unplanned.
- Tiny text in banners: Most viewers will not slow down to decode a paragraph at the top of the page.
- Generic descriptions: A vague “welcome to my channel” does not explain why students should stay.
- Overdesigned logos: A logo that looks good in a mockup can become unreadable as a small profile image.
The visual system should also fit the way you plan to record. If your teaching channel depends on live demos or face-to-camera lessons, the camera choice affects how polished the brand feels from the first upload. A practical overview of what to look for in a camera for streaming helps you match the look of the channel to the kind of teaching you do. For channels that lean on music, a separate example of how artists use AI music for YouTube shows how format and branding need to work together.
A channel looks more trustworthy when the viewer can identify the topic, the teacher, and the visual system without effort.
The visuals do not need to be flashy. They need to stay consistent. For students, that consistency signals the channel is maintained by someone who takes the teaching seriously.
Operational Settings That Affect Your First Uploads
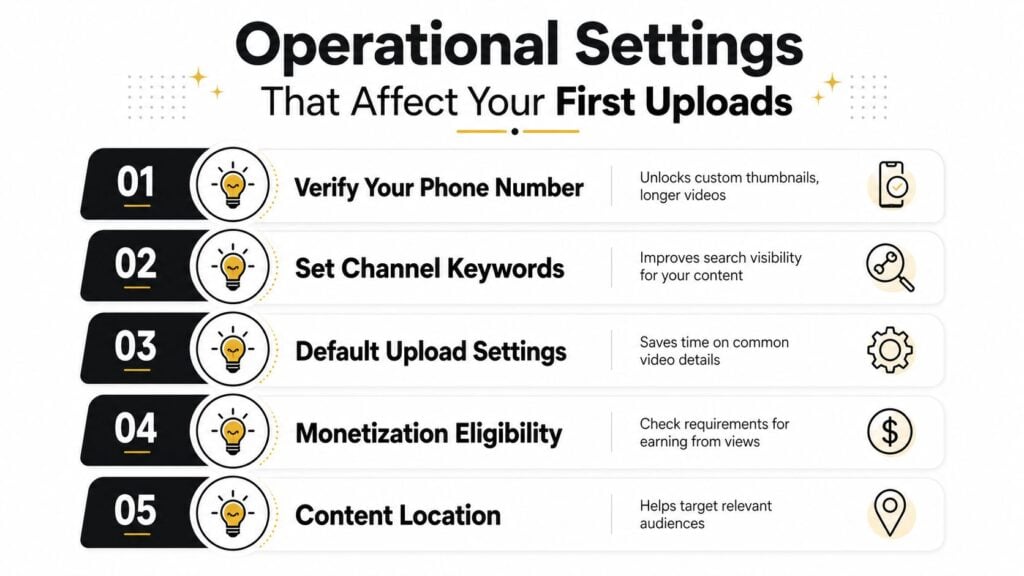
A surprising number of channels look ready and still stumble on publishing day. The problem is usually hidden in the settings, not the content. If verification and defaults are incomplete, the first few uploads can take longer, behave inconsistently, or miss the visibility settings you expected.
Phone verification unlocks the useful stuff
A common setup path is to open YouTube Studio, go to Settings, then Channel, then Feature eligibility, and verify a phone number to activate intermediate features. One YouTube setup guide also points creators to the same area for phone verification, which is the practical step that provides more than basic account access. Feature eligibility and phone verification walkthrough, YouTube setup guide on phone verification
That verification matters because creators are often trying to publish, customize, and grow at the same time. Without the right features activated, the workflow gets clunky. I’ve seen educators burn time on a first upload only to discover a missing setting was blocking the smooth path forward.
The next technical control point is upload defaults. That’s where you standardize common metadata and visibility choices so future uploads don’t start from scratch every time. For a solo educator, this saves repetitive setup work. For a team, it reduces the chance that one video goes out with the wrong defaults and creates cleanup later.
You also need to set the audience designation correctly for children. YouTube Studio includes a channel setting where creators must state whether the channel is made for kids, and that choice affects how YouTube treats the content. Children’s audience setting walkthrough
A few operational habits make launches smoother:
- Verify early: Do the phone verification before the content rush starts.
- Set defaults once: Standardize recurring fields so uploads don’t depend on memory.
- Check visibility: Avoid accidental private or unpublished videos during batch uploads.
- Confirm audience settings: Match the channel designation to the actual content.
For creators who build their videos around screen capture, course demos, or walkthroughs, the workflow side matters just as much as the camera side. A useful companion resource is best screen recording software for course creators, especially if your first uploads are tutorials or lesson clips.
There’s also a practical reason to think beyond YouTube when you’re setting this up. Some creators tie channel activity to wider production workflows, and resources like how artists use AI music for YouTube can be helpful when you’re planning asset creation and production speed around a channel launch.
If your channel is part of a broader creator stack, it also helps to review pick creator gear and studio while you’re choosing the recording environment. The fewer technical surprises you have during your first 10 or 20 uploads, the easier it is to stay consistent.
Connecting Analytics to Your Teaching Business
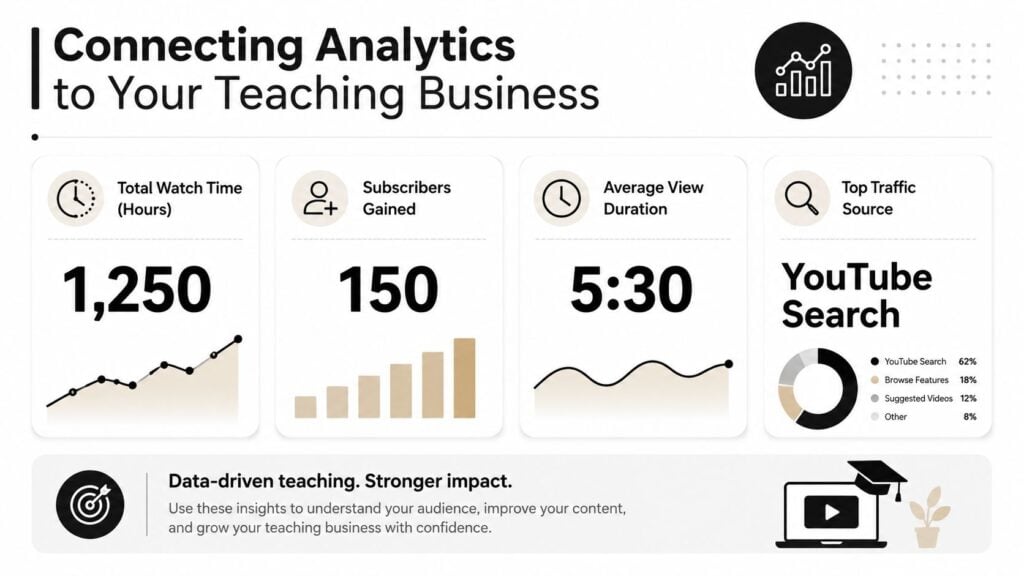
A channel that does not get measured turns into guesswork quickly. For educators, that matters because a video can earn views and still fail to attract the right students. The analytics layer gives you context that branding alone cannot.
The dashboard should answer business questions, not vanity questions
Inside YouTube Studio, the Analytics tab gives you a channel-level overview of views, watch time, subscribers, and revenue in a default 28-day window. That view is useful because it gives you a steady way to compare videos and spot what is changing at the channel level. YouTube Studio analytics overview
The habit I recommend is checking analytics within 24 to 48 hours after publishing. Early signals often show whether the thumbnail is pulling attention, whether the title is setting the right expectation, or whether the opening of the video is losing people too soon. For educational content, that feedback matters because clarity usually beats hype.
If you want deeper tracking, connect Google Analytics from YouTube Studio by going to Settings → Channel → Advanced settings and entering the tracking ID. A setup guide from freeCodeCamp shows that sequence clearly, and the value is in connecting YouTube activity to broader website or funnel measurement. How to track YouTube performance with Google Analytics
That cross-platform view matters for educators because viewers rarely buy directly from the video page. They may click through to a landing page, join a list, or move toward a course over several steps. YouTube alone cannot show that full path, so your channel metrics need to sit beside the rest of your teaching business data.
The analytics habit becomes more useful when you pair it with practical production choices. If your videos are built around tutorials, lectures, or software demos, watching retention and traffic patterns can show which lesson style is easiest for viewers to follow. LearnStream also covers video engagement metrics if you want a tighter way to connect watch behavior to content decisions.
Early analytics are useful because they reduce emotional guessing. A title may feel strong to you and still underperform with your actual audience.
Setting up a channel becomes running a teaching business. You are not just publishing. You are learning what students click, what they watch, and what moves them closer to your offer.
Before those first uploads, it also helps to pick creator gear and studio with the same operational mindset. The right setup is not the fanciest one, it is the one that lets you record consistently, publish cleanly, and see the numbers that show whether your teaching channel is working.